Tuesday, July 25, 2023

Teasel - Embroidered Linocut


"All the knots come to the comb." —Italian proverb


INSPIRATION

When I look back through my thousands of photos of plants, teasel is always there in every season.  I love it the spring when the combs are a lovely shade of green and I love it in the fall when the combs turn brown and the bracts curl upwards.  But it was my photos of the plant in summer that came to mind when thinking about a plant that might lend itself to embroidery.  Right now in the heat of the summer, teasel produces its lovely "tutu" of purple or white flowers.  At the base of each spine is a little ball which eventually becomes a flower.  These flowers, when blooming all together, form a ring around the teasel comb.  I loved the idea of printing the comb in green onto paper and then sewing on purple beads for the "tutu."

SKETCH

As always, I began by drawing the teasel on sketch paper.  

TRANSFER

The design can easily be transferred to the block by turning it over and rubbing the back with a card. This video shows that step.


CARVING

I then use my Flexcut carving tools to carve the design out of my "Safety-Kut" plate.
This video shows the carving process.


CLEAN PLATE

Once the carving is done I clean the plate with vegetable oil.  This is especially important when the color printed will be lighter...in this case green.  (You can get away with skipping this step if you are printing with black ink).
I absolutely love to photograph the plate at this stage.  I love how the light plays with all the ridges and valleys.


TEST PRINT

Once the carving is done, I like to pull a quick test print using a stamp pad.  It is a quick and easy way to see what you have without all the clean-up of regular printing.


CUT EXCESS AWAY


It is rather silly that I carve the way I do.  From the very beginning I could carve the excess away, but I like how the carved lines look.  And so I leave this step until the very end.

This video shows how I cleaned the plate with vegetable oil, stamped the plate to pull a test print, and cut the excess away.


COLOR

Fairly recently I started using my Sherwin-Williams fan deck of colors to help guide me when mixing my ink.  I choose my favorite color and then attempt to get as close as I can to it.  Sometimes it isn't the correct color in the end (as was the case this time), but I think it helps give me a good starting place.  
PRINTING

The day before printing I usually tear all my paper down to size.  It is also best to mix the color the day before, but I usually end up doing it right before printing because I don't like the extra clean up.  Below is the plate with a nice coat of green ink.

In this video I show how I roll ink onto the plate, place the paper down, burnish, and pull the print.  Plus, I have a special visitor!


I  ended up having to tear additional paper in the middle of printing because I thought the color of the first few prints was too light.
Below you can see the print before adding the embroidery.
I had a good time taking a few close-up angle shots on the dining room table.


BEADS

I let the prints dry a couple weeks before starting to play with my bead choice.  I played around A LOT with different beads for this print.  I originally ordered the translucent lucite beads but when they arrived I didn't like how they looked.  They seemed too uniform. 
I then found these beautiful purple Czech glass flower beads and thought I would use only those.  But again it was too uniform.  I finally ended up mixing them and really liked the effect.  
SEWING

I fussed and fussed with the beads to find the perfect placement.  I then took a photo of them with a ruler and printed it onto a transparency with the thought that I would poke all the holes ahead of time.  But sometimes you can't always sew the beads exactly where you planned because of slight movements of the beads when the thread tightens.  In the end I just used the transparency as a guide and did my best to eye-ball the placement.  
FINAL PRINT

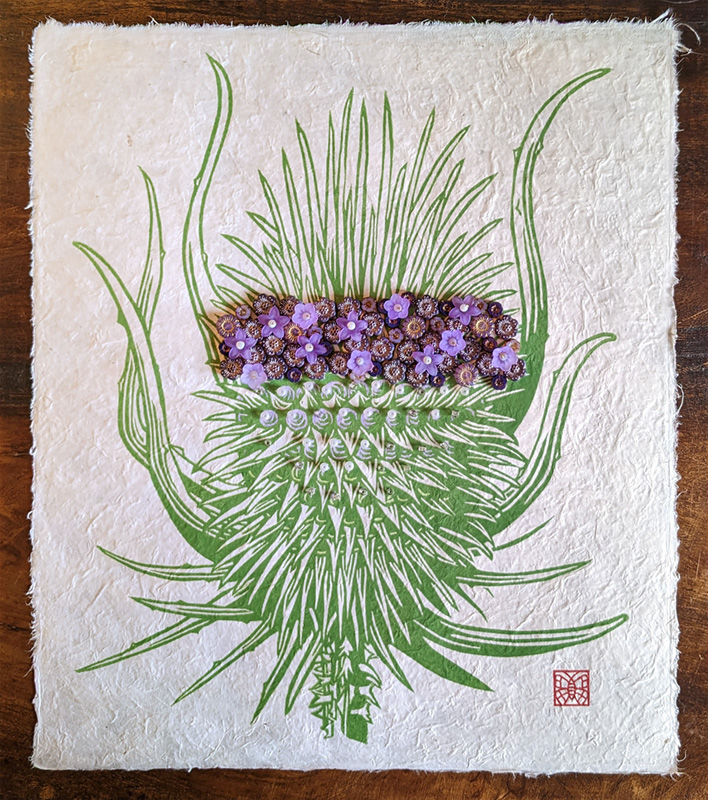
Below you can see the final print with the embroidery.
To soften the transition between the print and the row of flowers I ended up adding tiny clear and translucent beads to represent "up and coming" blooms.

I was relieved to finally put the finished print into the flat files next to the "Passionflower" print.
FRAMING

And, of course, I was even more relieved to finally frame the piece for my show at the Weavers Guild.
SHOW

The "Teasel" was purchased during the show by my dear friend, Jenny.  It made me so happy she bought the piece because I have such fun memories of dragging her around to all the bead stores in Cincinnati.  A huge thank you to her for supporting me in so many ways.

Below is the label from the show.

CONCLUSION

“Seek the wisdom that will untie your knot.
Seek the path that demands your whole being.”
― Rumi

While researching teasel I came across numerous interesting references to its medicinal and physical uses.  Its genus Dipsacus means "to be thirsty" and refers to the plant's bowl-like form where the leaves meet the stem that collects both rainwater and dew.  The water "was long believed to have rejuvenating spiritual powers and was considered to be magical. The Irish believed it to be the wine of the fairies and it was forbidden to drink it" (Source). The Roman's referred to the plant as "Venus's basin" and the Christian's "Mary's basin" (Source).  The water was believed to have curative and cosmetic powers, especially for the eyes (Source).  In Chinese medicine the plant is called Xu Duan, which means, “restore what is broken.” (Source)

The water is also important to the plant as it provides a source of nutrients when insects fall into its waters. "It is partially carnivorous. That water is holy for the plant as well people—it is its own composting system" (Source). 
The physical shape of the plant's comb has also been historically important.  "The word 'to tease,' as in 'to tease out a knot' is the root for the name 'teasel' because the dried heads were used for centuries as carding combs for wool, before metal spines were created in factories. The Latin species name fullonum is related to the word 'to full' which means 'to card wool before spinning'" (Source).  
When I was Googling "Mary's Basin", teasel and knots, I came across something interesting.  Apparently Mother Mary is often referred to as "the Undoer of Knots."  I had never heard of this before and loved the idea.  There are even specific novenas you can pray asking for your knots to be undone.  One line of the prayer states, "In your hand there is no knot that cannot be undone." 
 
Painting by Johann Georg Melchior Schmidtner

In addition to teasel research, I have been thinking about knots for two very different reasons.  Last month was extremely dry here in Cincinnati and I have been watering a lot.  I am not proud of it, but sometimes when I am pulling the hose out and I see a knot I get crazy frustrated.  If I am really antsy, I might even give the hose a hard yank to see if it will magically come undone.  I think that has worked zero percent of the time.  I have found that most of the time, there is a true not...meaning that I have to go all the way back and feed the nozzle through the knot to get it undone.  But every so often there is a knot that is only caused by the hose being twisted back on itself.  In these cases all I have to do is lessen the tension a bit and the tangle is released.  Whenever this happens I feel like it is a message to me to slow down.  In these cases very little effort is required; all that is needed is a little attention.

"You untangle a knot with slow teasing, not sharp pulling,
and believe me we have here a knot such as I have never seen.
But I will unpick it. I will."
—C.J. Sansom

The other reason I have been thinking about knots is that I have had a tight muscle in my lower back (OK who are we kidding...in my butt).  Just last week my friend Mary recommended I get an acupressure mat that she has found effective.  When she showed it to me I was surprised to see that it was not the comforting mat I had envisioned, but a BED OF NAILS!!!  She swears that lying on this bed of nails relieves the knots in the muscles of her back.  (I currently have it in my cart on Amazon and have not yet pulled the trigger.)  

Somehow, the spiny comb of the plant I just made a print of is used to "tease out knots"...the plant collects water in bowls called Mary's basin...Mary is the undoer of knots...I have had knots in my water hose...and I am about to buy a spiny mat that gets out the knots in my muscles.  My brain is in a knot just thinking about all these connections.  When I feel confused I like to sit back and see what really "sticks out" to me as important.  When I did so, the takeaway message from this plant was,

"When broken,
pray to the Great Undoer of Knots,
be she clad in robes or spines,
and be restored."


The "Teasel" print is now available at NessyPress.com.


TEASEL

To see clearly how
to loosen the knots
take a drink from my basin
dive into in my waters
comb in hand
spine meets flesh
release the tension
all consumed
until you appear
a purple flower 
no knot
cannot be undone


Tuesday, July 4, 2023

Passionflower - Embroidered Linocut


"The real work of this life is not what we do every day from 9-5…
The real work is to be passionate, be holy, be wild, be irreverent,
to laugh and cry until you awaken the sleeping spirits,
until the ground of your being cleaves
and the universe comes flooding in."
— Geneen Roth

INSPIRATION

When I told George (hubby) the Weavers Guild asked me to have a solo exhibition that included embroidered pieces, the first thing out of his mouth was, "How about a Passionflower?".  The thread-like flower was the absolutely perfect subject to portray with embroidery.  Just the thought of how cool it would be pushed me to say yes to doing the show.  It also happened to be blooming right at that time and I was able to go into the backyard to take reference photos.  The flower is so stunning that one hardly notices the plant has really beautifully shaped leaves.


SKETCH

When composing the sketch I had to balance four elements: the flower, the leaves, the fruit and the tendrils.  I spent a lot of time fussing with the tendrils.  I also had to figure out what would be printed and what would be embroidered.  I planned to print everything in green except the sepals/petals of the flower, which I would cut out and print in pale purple.  As you can see in the photo above, the thin filaments of the flower actually "sit" on the sepals/petals.  And that is the part I planned to embroider.


TRANSFER

Here you can see the sketch has been transferred to the carving block.  It is always a good idea to either print out the reverse image for reference while carving (or flip the sketch over if done on translucent sketch paper). 


CARVING

When I was carving this piece in December, it was so cold outside I moved everything into the middle storage room in the basement where it was warmer.  Otus kept a close eye on my work.


The flower was the first element I cut out.  My plan was to print everything at the same time...so I would ink the plate green and ink the flower in purple and carefully lay it back in.  I had never done this puzzle-piece kind of printing before and was a excited to try it.


After carving all the interior details I cut the excess plate away from the leaves.  I love how the plate looks before printing.


TEST PRINT

Before printing with "real" ink I like to pull a quick test print using a stamp pad.  This helps me check to see if I need to make corrections before printing with the oil-based ink, which is harder to clean up.  Here is a video of that step.


Seeing the test print I noticed that I missed carving the lines of bottom-most leaf.  Sometimes you can only see these things once they are printed!


PRINTING

In this video you can see me inking both the green leaves and lavender flower and then placing them together for printing.  I then laid the paper down and burnished.  You can't tell in the video, but I freaked out a little on the inside when the flower came up with the print!  Luckily I was able to just peel it off and the print was OK.


Oooh, I love a photo of wet ink on a plate!


And here is the print, ready for embroidery.

EMBROIDERY PLANNING

I have found the best way to sew into paper is to plan ahead.  This means scanning the print into the computer and planning each hole in Illustrator.  It was particularly important for this piece as I wanted the flower to have the radiating lines be equally spaced.  And I wanted the lines to be shorter on top than on bottom to give the illusion of fore-shortening.  


I also had to make sure the holes wouldn't be too close together or the paper would tear.  I literally printed this out on paper five or six times and decided the holes were too close together.  Each time I had to go in and re-make the lines...I wanted to tear my hair out by the end!  


You will understand after watching this video.


PUNCHING HOLES


Below you can see I printed out my planned lines and holes onto a transparency so I would know where to hammer the holes.  You can also see flower lines in the background that were too close together.  I didn't want to waste transparencies so I kept lessening the number of lines and trying again on the same transparency.


GROMMET

I don't know why, but I love grommets.  When I was first starting to think about this piece I knew I wanted embroidery radiating from a central hole and that hole would need support.  A grommet was the perfect solution!  I thought I was going to use a metal grommet.  I even bought metal grommets with that intention.  But as I went along I realized that maybe a metal grommet would rust over time.  So I started researching plastic grommets.  


The problem with plastic grommets is they only sell the squeeze hand tool that won't reach very far into a piece of paper.  I ended up using my metal grommet die mandrel with the plastic grommets.  As you will see in the video, it didn't work perfectly, but it got the job done.  I ended up making tiny slices into the plastic grommet with an X-acto blade to help it flatten. It was a balance between hammering hard enough to connect the front and back, and being careful not to crack the plastic grommet. This video shows making the holes and attaching the grommet.


I think I made it look easier than it was in the video. I had to hammer A LOT and fairly hard. The risk of cracking the grommet or messing up the paper was high and I REALLY didn't want to ruin the print after punching all those holes (not to mention all the work printing!).


That is why I did a little dance when the grommet was set and paraded it around the house.


EMBROIDERY

It was very satisfying to start the embroidery and to watch as the flower formed.


FABRIC MARKER

My original idea for the pink filaments at the center was to use embroidery thread.  However, once I saw the span of the threads to cover the grommet I realized it would be too much pink.  I decided to use a fabric marker instead and this gave me more control.  Plus, if you look closely at the flower, the pink part looks kind of "dotted" and this was easier to achieve with the marker.


This video shows the sewing and coloring of the flower.  I spend a fair amount of time making these videos trying to get the music to match the activity.  I was super happy with the way this one turned out, so turn on your volume!


BEADWORK

I knew the reproductive parts of the flower were going to be the most challenging to make, and I bought a ton of different bead options.  Here is a diagram of the parts so you know what I am referring to.

When I saw these stone beads at Michaels I thought I could use the "tubes" as the tree-like styles.


However, the "tubes" were too long.  I tried cutting them with my Dremel tool but it was REALLY hard.  Finally I pulled out my thirty-year-old wet saw and it worked like a dream!


When I first made the anther "tree" I was so excited that I got it to "stand up" just using the tension of the thread.  I did have a giggle at how phallic it was.  But I was just following what the stigma and styles really looked like! 

It made me laugh (and cry) even harder when I tried to feed the "tree" through the center hole in the flower and it wouldn't fit!  I ended up "cutting my tree down" and had to sew the tree through the hole, which was not easy.

I studied the flower closely to decide which beads/stones to use and in this photo was trying to decide how to represent the anthers.  


I chose tiny gold stones for the anthers and decided to connect them with thread instead of a bead or wire because there was already a lot going on.


This video shows the beadwork process.  Something about the music in this one makes me laugh, so again, make sure your volume is on!


When I finished the beading I was so glad and breathed a big sigh of relief. The hardest part was over!  I remember taking this photo and then put it away in the flat files for safe-keeping.

...But then it occurred to me that I couldn't really call the piece finished because I hadn't painted the three fruits yet.  

WATERCOLOR  FRUIT RUINATION

I have hand-tinted my prints with watercolor a million times and it doesn't take me very long...so I thought I should finish the piece.  However, I chose a new paper for the embroidered prints, called Nepalese lotka paper, that I have never used before.  Just to be safe I did a little test on a piece of paper.  I was very happy with the color and even Photoshopped it into the print to make sure I liked it.  Yes, I did...so I proceeded.


I  started at the top left fruit and worked my way down.  It only took about thirty seconds to paint one fruit.  When I was on my third fruit I started to notice something out of the corner of my eye.  At first I couldn't understand it.  Why was there color where I hadn't painted yet?  Did I color outside the lines?  And then the sick realization came over me that the watercolor was BLEEDING...and not just a little bit!

It all happened so fast.  In less than a minute I had ruined the print I had worked on for weeks!  

In the above photo it only looks a little wrinkly where it bled.  But in real life there was a subtle, yet present yellow green color.

COLORED PENCIL FIX?

I was sick about it.  My mind raced to think of a solution.  At first I thought I could softly color in the background a light yellow green to cover up the bleed.  In this video you can see my desperate attempts to fix the problem.  Things got darker and darker on many levels.  I thought about calling the video, "From Beading to Bleeding" but chose the more optimistic title, "Bleeding, The Descent of Darkness, and Ruination."


In hindsight I should have realized the potential for bleeding after my color test on that scrap of paper.  I remember at the time thinking that my test circle had beautiful edges...edges that were created by bleed!  Anyway, I might have been a tad dramatic in my above video.  But at the time it felt terrible.  
When I look at it now it is not quite as bad as I thought.  But it certainly was not what I was going for.  So I decided to start over again.


STARTING AGAIN

This blog post is turning into a tome so I thought I would spare you the re-making of holes and grommets and start with the sewing.

The good thing about starting again is that I had a chance to make changes.  I thought the white thread of the flower was not impactful enough the first time around, so I changed the outer threads to purple.  


Above you can see the sewing progress and below the final print with new sewing.  I was happy with the purple thread.
NEW BEADS

I also decided that the stone beads were too heavy and thought I would try something new.


I bought lots of new "tube" options for the anthers and ended up choosing a delicate Dentalium bead.  I chose Dentalium because the shape starts very thin and expands bigger, like the actual styles do.  


I almost chose a Buddha as the central ovary, but in the end went with a lovely carved white Bohdi bead.  I don't think it is from a real Bhodi tree, but I liked the reference to the sacred fig tree. 

Below you can see I also chose tiny gold metal beads as the anthers this time around. I decided not to connect them with any thread because I liked the cleaner look and felt their presence was enough to represent the anthers.  Any self-respecting plant biologist should know what I was going for!


COLORED PENCIL FRUIT!

As you might imagine I was SUPER nervous to color in the fruit.  I did a gazillion tests of various media and ended up going with a combination of colored pencils and metallic crayons.  The metallic is very subtle, but I was pleased with the overall effect and so very thankful to finish the piece!


CHOP & SIGNATURE  

Because I am not a total sadist, I had put the chop stamp on the prints before making the holes, grommeting, sewing, beading, and fruit coloring.  Technically you are supposed to do this step at the very end as a stamp of approval.  But you also risk messing up the whole piece with a blurry or crooked stamp!

FINAL PRINT

Below is a photo of the finished piece.  

FRAMING

I really liked the natural wood of this frame with the purple of the passionflower.  And I will be offering these prints framed on the website.


SHOW

At the Weavers Guild show the "Passionflower" hung next to the "Teasel" print.  


When I was researching the passionflower to make the label for the show I, of course, came across the common reference to it as a saint's halo and association with the crucifixion of Christ.  But the flower was also known to native Americans before the arrival of the Spaniards.  There is a fascinating discussion of the role passionflower likely played in the lives of native Americans here that suggests that its calming opioid effects were well known and potentially used to open doorways to the supernatural.  The same author also fully explores its historic use as a symbol of homosexuality.  

But what I find most interesting about this flower is its call to us to explore our passion.  I actually remember seeing this flower for the first time.  We had moved into our house in Cincinnati and I was walking through  the backyard.  In the far end of the yard was a fence with a vintage wire trellis and when I turned the corner I saw a flower that stopped me in my tracks.  I had never seen anything like it before and could hardly believe that such a flower existed.  It looked like living purple fireworks with another fireworks coming out the middle...and it was alive!  

It is funny that I even recall that moment, but the plant really had quite an effect on me. I had no idea that twenty years later I would make an embroidered print of the flower and be writing a VERY long blog post about it.  But it sparked something in me that day.  It sparked a passion I didn't even know I had.  My love of the shape and form of plants was in its infancy, but it was certainly there...and the plant brought my full attention to it.  With it's radiant purple hair, coiled tendrils and trident leaves, the passionflower seduced me.  How fortuitous that, all those years ago, a plant with the name "Passionflower" lit some internal fireworks that have led me to my vocation as a botanical artist and seeker of the miraculous in the mundane.

And I would argue that we all have something that lights us up.  Yes, every single person has this thing we call passion.  We don't know it, but we are all walking around looking to be lit up.  I think it happens all the time.  This lighting doesn't have to be a lightning burst... it could be a little spark.  But we have to notice that scintilla and perhaps blow on those flames to keep them alive.  We may have to feed it some kindling and tend the flame with attention and care.  So I am always on the lookout.  I keep my eyes open for that flicker of interest...that sparkling tug of the heart.  Because that little tug has the potential to grow into our passion.  And when we find it, there is no doubt we will "shoot across the sky and let our colors burst."  It is my deepest wish for us all, because there is nothing else like seeing a soul on fire following their passion.  Happy Fourth of July!  

"Boom, boom, boom
Even brighter than the moon, moon, moon
It's always been inside of you, you, you
And now it's time to let it through
'Cause baby, you're a firework
Come on, show 'em what you're worth
Make 'em go, "Oh, oh, oh"
As you shoot across the sky
Baby, you're a firework
Come on, let your colors burst
Make 'em go, "Oh, oh, oh"
You're gonna leave 'em all in awe, awe, awe"

Singer
Katy Perry 
Songwriters
Esther Dean / Katheryn Hudson / Mikkel Storleer Eriksen / Sandy Julien Wilhelm / Tor Erik Hermansen


This print is now available at NessyPress.com.