My love of flowers and folk patterns inspired this year's holiday linocut print. I was also excited to try printing metallic gold on a dark background. Below you can see my sketch (flipped) and the final carving.
The carving took me a couple hours. It is so relaxing to put on a podcast or music and work on it. I like to think the good energy of what I'm listening to works its way into the print.
This year I was determined to print early and not to overdue it. I ended up printing almost 150 prints over 5 different days...all before Thanksgiving! After they were dry I spread them all out on the basement table and had a photoshoot.
George and I were also inspired to include a short poem about 2019 with each print.
I was thinking about why I make these prints every December. . . and the point to me is to spread a little joy. I wish I could send a handmade print to everyone! Although my back may not allow that, I can wish everyone who is reading this blog a very Happy Holiday and great joy in the coming year. Peace to You.
This fall I participated in an exhibition called "Think Square" that showcased the work of local artists working in ceramics, sculpture, painting, drawing, printmaking, photography, fiber and glass. Each piece had one main requirement: it had to be 5'' wide by 5'' tall.
I chose our cat Bubo as my subject because IMHO all printmakers should print their cats and Bubo is incredibly cute. This blurry little image from a video was my inspiration.
In the following video you can see me pull a test print of the "Cat and Mouse."
Below you can see the final prints drying. Each print is 5 3/4'' wide by 7'' tall and there are 31 prints in the edition. The actual size of the printed area is approximately 5'' x 5''.
The show was curated by Andrea Knarr who was a printmaking professor at NKU for many years. I met her recently when I took her framing class at Tiger Lily Press. A big thank you to her for putting together a great show.
The night of the opening was really fun. All the pieces in the show were framed the same so the show looked really cohesive. The show is up until Nov. 22 so there is still time to go see it. The artwork was really fantastic and most pieces sold the opening night, including mine!
Between working on the giant sweetgum and this print I can see there are some advantages of working smaller. In the coming year I hope to experiment with printing some small to medium-sized prints.
If you are interested in purchasing the "Cat and Mouse" visit my website NessyPress.com.
“I believe in love. And beauty. I believe that every single person has something they find beautiful and that they truly love. The smell of their child's hair, the silence of a forest, their lover's crooked grin. Their country, their religion, their family. And I believe that if you follow this love all the way to its end, if you start with the thing you find most beautiful and trace it's perfume back to its essence, you will perceive an intangible presence, a swath of stillness that allows the thing you love to be visible like the openness of the sky reveals the presence of the moon.”
When I thought about how this project started I realized the entire idea began from a failed attempt on a different project. The story began this spring when I was on Facebook and saw there was a call to artists to submit sculpture proposals for the town of Silverton. I had not done large sculpture in a while so I was surprised that my mind kept going back to the idea of submitting a proposal. I tried to ignore those thoughts by going on a walk. While walking through my neighborhood I kept coming across vast amounts of sweetgum balls. And that is when the idea came to me to weld a giant metal sculpture.
Once I thought of the idea I couldn't stop thinking about how I would do it and the reality of making such a large sculpture. For days I tried to push the idea out of my head, but I would go to bed thinking about it and wake up thinking about it. And every day on my walk I would come across sweetgum balls everywhere.
The next day I decided to walk towards Xavier. I needed a ride to Dayton later that week and thought I might ask the sculpture professor who lives in Dayton for a ride. When I stopped by his office he wasn't there. I gave up on the idea because "what was the likelihood that it would work out?" ...and besides I hadn't seen him in years. As I was passing the last building on campus who did I almost bump into walking out the door?...the sculpture professor who happily offered me a ride to Dayton. Later that week I rode up to Dayton with him and we talked about various options, materials, sizes, bases, methods, etc. of making the sweetgum sculpture. He was so encouraging I thought maybe I should actually do it.
When we got to Dayton he dropped me off near his house and my Mom picked me up in her car. When we got to my Mom's house I was unloading the car when I saw something on the floor. When I bent over to see what it was, it was a single beautiful sweetgum ball. In my head I thought, "OK universe! I get it! You don't have to keep throwing sweetgums in my path!" So I submitted my proposal.
“Every failure brings with it the seed of an equivalent success.”
― Napoleon Hill
As you might guess, I did not receive the commission to make my giant sculpture. But around the same time I came across another post by Lyell Castonguay about the BIGINK. The BIGINK is an extraordinary opportunity for printmakers to create a large woodcut that is printed by Lyell on his giant travelling press. If I wanted to apply to participate, I had to come up with an idea for a giant woodcut fast. And what do you think sprang into my head? I had had sweetgums floating around my head for months so it was the obvious choice. I submitted my application and my idea was accepted!
I began the process by making a giant pencil sketch, transferred it to my plate, and then spent the next couple months carving. You can see the carving process here. I carved up until the very last minute before we took off to Columbus to participate in the BIGINK. It was a truly remarkable experience that I highly recommend. I loved meeting the other artists and working with them to print everyone's woodcuts. Lyell printed three prints total of each artists' woodcuts and we each got to take two of our own prints home with us. You can see my post about that day here.
The two prints I brought home from the BIGINK were printed on beautiful Japanese paper. But I usually like to print on thick paper so I decided I would try to hand burnish six more prints. I have only hand-burnished my usual safety-kut lino and was a little nervous about how it would go with a woodcut. Luckily I had some help from two George's. The George on the left is a Tiger Lily Press intern who not only helped me burnish but also helped me cut my paper down to size. The George on the right is my husband. A GIANT thank you to both of them not only for their muscle but also putting up with my crazy attention to detail. Also a big thank you to my Dad who helped me cut paper and align my registration pins. So much gratitude and love for these guys.
In the photo above you can see what a difference the paper makes. On the left was a thin test paper I use to prime the plate and on the right is the thicker Stonehenge paper. People like to use thinner paper because you can see where you still need to burnish more. But I do love the feel of thick paper and you can still see through it a little.
It took two days to pull six prints. I experimented with spending a bit more time on each print than I had in the past. I found that lifting the paper up to peak underneath to see spots that needed more work was very helpful. And while the paper is lifted I tried adding more ink to the plate. You do risk misaligned or blurry images so you have to be very careful not to pull the paper up too far. But I found it to be very effective at fixing light spots.
Below you can see the final print with my chop signature added in the bottom right hand corner. (You can see a video of adding a chop here.)
In the following photos I tried to capture a few of the intimate encounters between the pairs of arms nestled in this sweetgum world.
Whenever I start a project I have no idea where it will take me or how long or involved it will be. I had no idea that submitting a sculpture proposal would end up in a giant sweetgum woodcut. But I do know that it is important to pay attention when something keeps popping up in my head. And to notice when the universe showers me with sweetgums. I used to think these things were casual coincidences. But I am discovering these synchronicities are signposts on the path if I only have eyes and ears to recognize them. I am slowly learning to have trust in what life is offering me and to rest in the many arms of that mystery. It doesn't mean that I can rest on my laurels. It means I listen when I hear the call to pick up a seed pod and put it in my pocket. And I take action to plant that seed when the time is right.
“What seeds are you planting?”
― Lailah Gifty Akita
If you are interested in purchasing a print, visit my website NessyPress.com.
I recently achieved one of my life goals... I carved my first giant woodcut. On Sept. 7, 2019 I participated in the BIG INK. The BIG INK was started by Lyell Castonguay and Carand Burnet to inspire greater public appreciation of large-scale woodblock printmaking. They travel the country with their giant press printing local artists' woodblocks. In my last post I described the carving process and in this post I will show how six intrepid printmakers spent the day printing woodcuts with Lyell and Carand at the Columbus Cultural Arts Center.
We started the day by taking a couple group photos outside.
Then Lyell explained to us our various jobs and how we were going to help him print our woodcuts.
We also got to learn a little about each printmaker and their backgrounds.
It was especially exciting to me to meet other large-scale printmakers and to find out what drew them to do this. I think it takes a certain kind of person to want to do large-scale relief printing. You have to be detail-oriented, ambitious, confident and little bit wacky. It was clear from the caliber of work that we had all put a lot of time and effort into our woodcut and that shared sense of effort created an immediate comraderie.
“Tell your story.
Shout it. Write it.
Whisper it if you have to. But tell it.
Some won't understand it.
Some will outright reject it.
But many will thank you for it.
And then the most magical thing will happen.
One by one, voices will start whispering, 'Me, too.'
And your tribe will gather.
And you will never feel alone again.”
― L.R. Knost
We were all also very impressed by "The Big Tuna." It is a giant portable press that can print woodcuts up to 40 inches wide and 96 inches long!
Below you can see each artist with their prints and contact information if you are interested in their work.
Leah Storrs-Fisher
Leah's print was the first print of the day and her forested woodcut printed perfectly. Leah is a Columbus-based fine artist and printmaker. You can see more of her work on her website LeahStorrsFisher.com. She is also on Instagram @leahstorrsfisher and Facebook. It was truly a pleasure getting to know her and her work. Leah is like a ray of sunshine and I hope she will come visit me in Cincinnati next time she has a show here.
Jonpaul Smith
Jonpaul's incredible giant flower was the second print of the day. Jonpaul is a Cincinnati-based fine artist and printmaker. You can see more of his work at his website jonpaulcsmith.com. You can also find him on Instagram @jonpaulsmithart and on Facebook. I look forward to getting to know Jonpaul in Cincinnati and to pick his brain more about printmaking because he has a wealth of knowledge about all things print.
Kaitlyn Radloff
Kaitlyn's amazing skull woodcut was the third in line for printing. Kaitlyn came all the way from Wisconsin to print. You can see more of her work on her website here. Plus you can find her on Instagram @sabertoothstudio and Facebook. I immediately liked Kaitlyn because she has sorting hat powers and she put me in Gryffindor. I wish I could have spent more time with this quirky, magical schoolteacher.
Vanessa Sorensen
My sweetgum woodcut was the fourth print of the day and I am going to go into a little more detail about the process.
Because I had painted my plate red, I knew it would be an exciting moment to see the plate turn from red to black when it was inked. Below is a video of Lyell inking the plate.
After the plate was inked, Lyell brought the plate over to the "Big Tuna" and positioned it for printing.
The following video shows a summary of the day plus my plate going through the "Big Tuna."
On black and white prints I often like to add a chop signature. George took this video of me inking and placing the chop in the bottom right hand corner of the sweetgum print.
Below you can see the final print with the chop printed in the corner.
James Billiter
James' Ohio woodcut printed after mine. James is a well-known Cincinnati-based fine artist and printmaker. You can view more of his work at his website billiterstudio.com. You can also find him on Instagram @billiterstudio and on Facebook. I have been a huge admirer of his work for some time and it was a joy to get to know the artist behind the work. And, of course, this Ohio girl loves that print!
Bill Meyer
Bill's woodcut of John Lennon was the last of the day and it turned out wonderfully. His ability to carve what looked like scribbly lines was incredible. You can see more of Bill's work on his website billmeyerart.com. You can also find him on Instagram @view_mr_eye. Both Bill and I volunteered for paper duty and I had the tendency to wander off and get distracted. Bill's steadfast and gentle nature, plus his dedication to task made sure all of our paper was ready and perfect. It was such a pleasure getting to know Bill and I had the strange feeling that I had known Bill before...like we were old friends.
At the end of the day I felt like we had all graduated from the BIG INK and had our giant print diplomas to show for it. There is a special kind of bond formed from a shared experience like this. We had all put so much work into our woodcuts and they turned out beautifully. We are all now part of the "Fellowship of the Big Tuna." I REALLY enjoyed getting to know everyone. Thank you for making it a magical day.
"Fellowship: friendly association, especially with people who share one's interests." ― Oxford Dictionary
I also can't thank Lyell and Carand enough for organizing this experience and creating this community. I have wanted to print large for a long time and this was such a rare chance to realize that dream. THANK YOU!
“When we establish human connections within the context of shared experience we create community wherever we go.”
― Gina Greenlee
I also have to thank the three guys below for coming out and supporting me. Also thank you to my Mom for encouraging us to stay in Columbus for the weekend. An extra special thanks to the guy with his hand on the deer butt. I couldn't do any of my crazy projects without you and you put up with all my wood chip carvings around the house. A big smooch to you my deer!
This week I am going to hand-burnish a few more sweetgum prints at home. As soon as I am finished I will be putting the prints for sale up on the website so check back soon for the final post!
UPDATE
I printed 6 more sweetgum prints at home!
To read the story and see the final prints click here.
The final prints are now available for purchase on my website NessyPress.com.
"I have great faith in a seed. Convince me that you have a seed there,
and I am prepared to expect wonders."
― Henry David Thoreau
In May I found out about an opportunity to print a giant woodcut with the BIG INK. The BIG INK was started by Lyell Castonguay and Carand Burnet to inspire greater public appreciation of large-scale woodblock printmaking. They travel the country with their giant press printing local artists' woodblocks. I have always wanted to work large and was so excited I was accepted to participate in their event at the Cultural Arts Center in September 2019.
In this post I will tell you how I carved a giant sweetgum ball woodcut.
The Photo
I began the process by choosing and photographing my subject. In this case I chose a sweetgum ball because the BIG INK only allowed printing in one color (black) and I wanted an object that had an interesting form.
It is utterly amazing what you can notice when you look closely at something. When I began to study the sweetgum, I found pairs of spiky arms that appeared to be giving each other an affectionate head-to-head greeting. Certain pairs appeared to be talking while others were in an intimate nuzzle. And when I looked even closer, I noticed peculiar globular pathways that appeared like dotted starfish separating the pairs of arms. An extraordinary scene taking place on this tiny sweetgum pod!
If you will stay close to nature, to its simplicity, to the small things hardly noticeable, those things can unexpectedly become great and immeasurable.―Rainer Maria Rilke
I usually like to print my subject to the actual size I want the final piece. I don't have access to a large printer so I tile the image and tape the pieces together. Below, Otus is providing a sense of scale for you.
The Sketch
Once I have my image printed large I like to do a very light tracing of the important elements. I work light because I often end up moving things around or making elements larger. In this case I moved arms around to make a composition I liked. After I have the shapes outlined I then complete the shading. Here you can see Bubo was trying to point that out with his tail.
The sketch took me about a week to complete. Here is a short video of the sketching process (turn up your volume, there is music!).
Below are the finished sketch and a detail photo.
“Love is in the sensual details.” ― Lebo Grand
The Transfer
Usually I work with "Safety-kut" linoleum and the transfer simply involves flipping the sketch over and rubbing with a credit card (click here for video of that). But with the wood it didn't transfer quite as well. I ended up taping my sketch on one edge and would flip it over and use carbon paper to darken the transfer in certain spots that were light. In hindsight it might have been easier to just use carbon paper on the whole thing. Either way it is always a good idea to keep the sketch taped on the side until carving is complete.
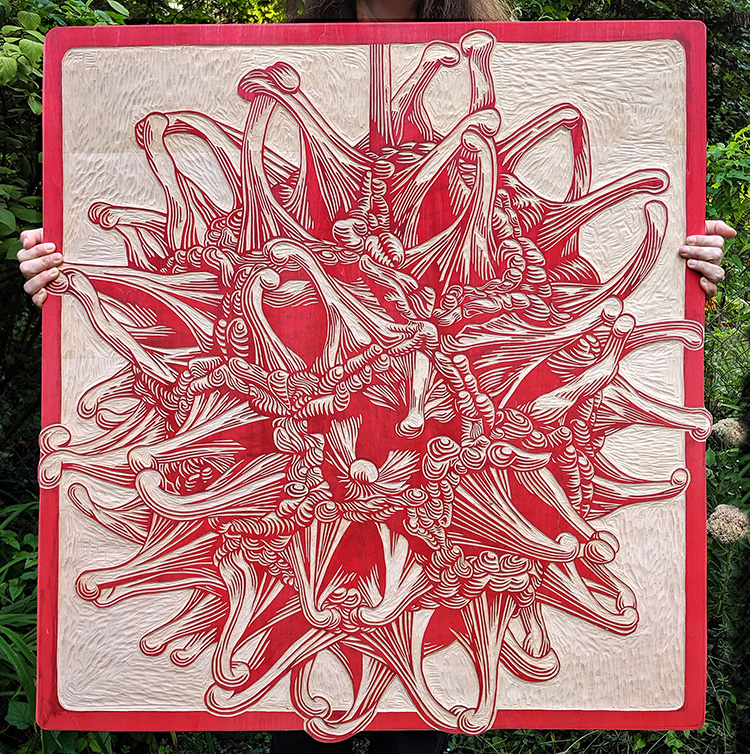
Side note: I used Shina plywood from McClain's printmaking. Lyell recommended it and it was easy to carve and light. You might also wonder why I painted the wood red. Red is a nice neutral color that allows one to still see the pencil lines but also provides a nice change of color so you can see where you have carved.
The Carving
Once the drawing was transferred I began carving. I mainly used Flexcut carving tools, but my friend Tom made me a hangi-to carving knife! The knife had a lovely soft feel to it and I used the knife quite a bit. Thank you so much Tom...it was a very thoughtful and useful gift.
Here is a video of me using the knife to make a line and then chiseling up to the line.
The photo above was taken about halfway through the process. Below you can see the lovely texture created by carving.
In the following image you can see my setup with my sketch taped to the right of my carving so I could flip it over any time I needed. The only problem was Otus. Every time he would hop down from the window he would crunch up my drawing. Eventually I ended up moving the table away and putting another smaller table so he could hop down.
George took this photo of me carving and I liked it because you get a sense of the quantity of shavings. All my clothes had wood shavings on them that I would spread haphazardly around the house.
I loved the serene mountains that were created by clearing the large open areas. It looks like waves or dunes in the desert.
I made the following video of the entire carving process from start to finish. (Again, turn up your volume!)
Once the carving was finished I had a dreaded task. I wanted to carve away the excess wood around the outside of my square. I wanted to do this because ink will inevitably get on that extra wood and will print. It was sooooooo nerve-wracking because I spent so much time on the carving and didn't want to ruin it by accidentally cutting the arms that extended outside the square.
As you can see below in the upper left-hand corner, my test cut using the jig saw did not go well. Luckily my neighbor Mark loaned us his Japanese saw. After my epic fail with the jig saw George thankfully cut the board with the Japanese saw and a coping saw. I then used an orbital sander to clean things up.
Here you can see how the arms extended past the square.
"When you pay attention to detail, the big picture will take care of itself."
― George St-Pierre
Off to Print
I was literally carving up until we had to get into the car to head up to Columbus for the BIG INK. Before we put it into the car George took this photo of me with the plate. You might not be able to tell but I was standing in front of my neighbor's sweetgum tree, exhausted but happy.
“She was a seed in spring
and a wildflower in autumn.”
― Giovannie de Sadeleer
In the next post I will show the printing process both at the BIG INK and at home. I'll be printing a few more this week!
UPDATE
To see my post about the BIGINK click here. To see my post about the final prints click here.
The final prints are now available on my website NessyPress.com.