"I have great faith in a seed.
Convince me that you have a seed there,
Convince me that you have a seed there,
and I am prepared to expect wonders."
― Henry David Thoreau
In May I found out about an opportunity to print a giant woodcut with the BIG INK. The BIG INK was started by Lyell Castonguay and Carand Burnet to inspire greater public appreciation of large-scale woodblock printmaking. They travel the country with their giant press printing local artists' woodblocks. I have always wanted to work large and was so excited I was accepted to participate in their event at the Cultural Arts Center in September 2019.
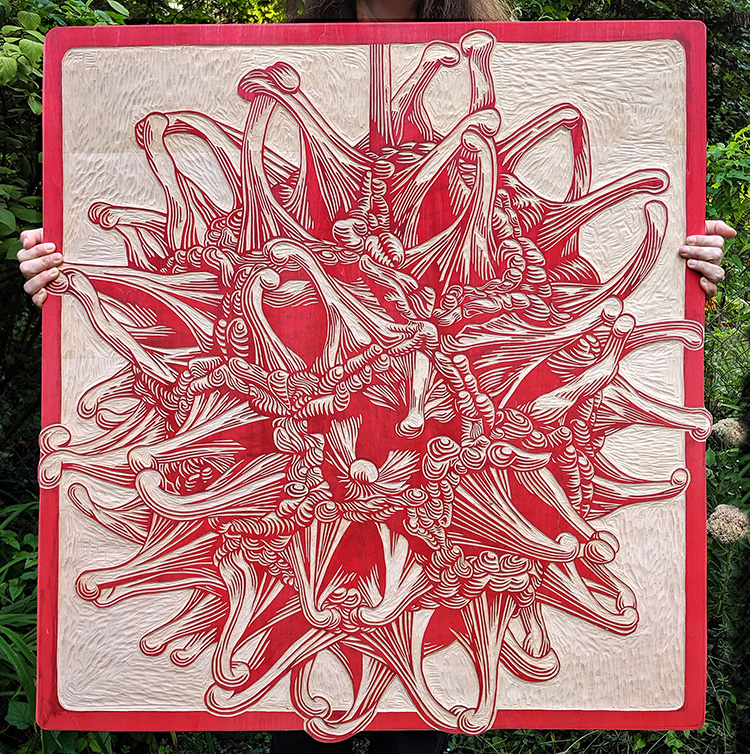
In this post I will tell you how I carved a giant sweetgum ball woodcut.
The Photo
I began the process by choosing and photographing my subject. In this case I chose a sweetgum ball because the BIG INK only allowed printing in one color (black) and I wanted an object that had an interesting form.
It is utterly amazing what you can notice when you look closely at something. When I began to study the sweetgum, I found pairs of spiky arms that appeared to be giving each other an affectionate head-to-head greeting. Certain pairs appeared to be talking while others were in an intimate nuzzle. And when I looked even closer, I noticed peculiar globular pathways that appeared like dotted starfish separating the pairs of arms. An extraordinary scene taking place on this tiny sweetgum pod!
If you will stay close to nature, to its simplicity, to the small things hardly noticeable, those things can unexpectedly become great and immeasurable. ―Rainer Maria Rilke
I usually like to print my subject to the actual size I want the final piece. I don't have access to a large printer so I tile the image and tape the pieces together. Below, Otus is providing a sense of scale for you.
The Sketch
Once I have my image printed large I like to do a very light tracing of the important elements. I work light because I often end up moving things around or making elements larger. In this case I moved arms around to make a composition I liked. After I have the shapes outlined I then complete the shading. Here you can see Bubo was trying to point that out with his tail.
The sketch took me about a week to complete. Here is a short video of the sketching process (turn up your volume, there is music!).
Below are the finished sketch and a detail photo.
“Love is in the sensual details.”
― Lebo Grand
The Transfer
Usually I work with "Safety-kut" linoleum and the transfer simply involves flipping the sketch over and rubbing with a credit card (click here for video of that). But with the wood it didn't transfer quite as well. I ended up taping my sketch on one edge and would flip it over and use carbon paper to darken the transfer in certain spots that were light. In hindsight it might have been easier to just use carbon paper on the whole thing. Either way it is always a good idea to keep the sketch taped on the side until carving is complete.
Side note: I used Shina plywood from McClain's printmaking. Lyell recommended it and it was easy to carve and light. You might also wonder why I painted the wood red. Red is a nice neutral color that allows one to still see the pencil lines but also provides a nice change of color so you can see where you have carved.
The Carving
Once the drawing was transferred I began carving. I mainly used Flexcut carving tools, but my friend Tom made me a hangi-to carving knife! The knife had a lovely soft feel to it and I used the knife quite a bit. Thank you so much Tom...it was a very thoughtful and useful gift.
Here is a video of me using the knife to make a line and then chiseling up to the line.
The photo above was taken about halfway through the process. Below you can see the lovely texture created by carving.
In the following image you can see my setup with my sketch taped to the right of my carving so I could flip it over any time I needed. The only problem was Otus. Every time he would hop down from the window he would crunch up my drawing. Eventually I ended up moving the table away and putting another smaller table so he could hop down.
George took this photo of me carving and I liked it because you get a sense of the quantity of shavings. All my clothes had wood shavings on them that I would spread haphazardly around the house.
I loved the serene mountains that were created by clearing the large open areas. It looks like waves or dunes in the desert.
I made the following video of the entire carving process from start to finish. (Again, turn up your volume!)
Once the carving was finished I had a dreaded task. I wanted to carve away the excess wood around the outside of my square. I wanted to do this because ink will inevitably get on that extra wood and will print. It was sooooooo nerve-wracking because I spent so much time on the carving and didn't want to ruin it by accidentally cutting the arms that extended outside the square.
As you can see below in the upper left-hand corner, my test cut using the jig saw did not go well. Luckily my neighbor Mark loaned us his Japanese saw. After my epic fail with the jig saw George thankfully cut the board with the Japanese saw and a coping saw. I then used an orbital sander to clean things up.
Here you can see how the arms extended past the square.
"When you pay attention to detail, the big picture will take care of itself."
― George St-Pierre
Off to Print
I was literally carving up until we had to get into the car to head up to Columbus for the BIG INK. Before we put it into the car George took this photo of me with the plate. You might not be able to tell but I was standing in front of my neighbor's sweetgum tree, exhausted but happy.
“She was a seed in spring
and a wildflower in autumn.”
― Giovannie de Sadeleer
In the next post I will show the printing process both at the BIG INK and at home. I'll be printing a few more this week!
UPDATE
To see my post about the BIGINK click here.
To see my post about the final prints click here.
The final prints are now available on my website NessyPress.com.
UPDATE
To see my post about the BIGINK click here.
To see my post about the final prints click here.
The final prints are now available on my website NessyPress.com.


