Wednesday, May 28, 2025

"Rocky" Linocut


"Enjoy the Rocky Road"
Vanessa Sorensen

The above quote was taken (and altered) from a little embroidered tag sewn into the lining of a pair of pants I used to own.  The original quote read, "Enjoy the Rough Road."  The pants were from a brand called "Rough Hewn."  I remember wearing those pants through many a difficult time.  And every time I saw that little tag,  I was reminded that even the hard times have something to offer us.

When I was looking for a quote for this post and couldn't find the perfect one, this altered version popped into my head.  To me it has a triple meaning: 1) The aforementioned...enjoy even the tough experiences. 2) Relish the precious time we have with our pets, specifically Rocky. And 3) It is something one might yell out to a person on their way to an ice cream parlor.  Savor that delicious flavor of chocolate ice cream with diced marshmallows and nuts!  Whether difficulty, puppy, or ice cream, treasure this life in all of its various flavors.

INSPIRATION

On most Saturday nights we make our way up the street to game night at our neighbors' house.  And every single game night we are greeted by a very enthusiastic boy named "Rocky."  Rocky never seems to tire of greeting us and is very happy when we "accidentally" drop a morsel of food for him to snarf up.  He is a sweet-natured boy who will present his white belly for tummy rubs at a moments notice.  And who could resist belly rubs with that adorable ear sticking up?  Certainly not I.

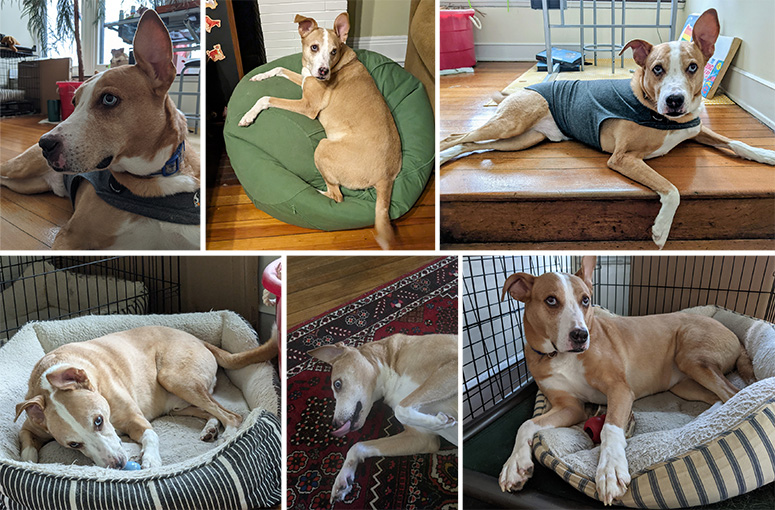
Last month it was our host Mark's birthday and at the last minute I decided to make him a "quick" linocut.  I poured through my old texts from Mark and found the images below.  


I ended up choosing this photo as my reference, as he is looking very handsome, and it showed his one-ear-pointiness perfectly.
SKETCH

I cropped the photo for my sketch.  I also made a few minor changes to his position and removed his t-shirt.


CARVING

I transferred the drawing to my Safety-kut plate and carved the image using my Flexcut carving tools.  


TEST PRINT

I like to pull a quick test print using a stamp pad to make sure the design is what I want.  After seeing this test I knew I had to shave a bit more off his nose and thin some of the lines a tad.
PRINTING

After making my final adjustments it was time to print.  


Below is a short video of the entire process.  It is rare that I find a song so fitting and I was very pleased with how the video came together.  I googled "songs about dogs" and found Patti Page's "How Much Is That Doggie In The Window?".  When I added the song to my photos and videos, I was surprised at how perfectly it worked.  Make sure you turn your volume on!


I really only needed one good print, but I have learned it the past to make more than I need.  You never know if one might get ruined while adding watercolor.  This time I made an edition of four.


WATERCOLOR

I was going to make a video of adding the watercolor, but I had a weird issue with the paper.  I almost always use Stonehenge paper for my prints as it is the perfect smoothness for hand-burnishing (some of the traditional printmaking papers have a rougher surface and you have to press quite hard to get a nice print).  Stonehenge also takes watercolor beautifully.  When looking for paper for this print, I found what looked like Stonehenge laying around the studio and tore it down to size.  It printed just fine.  That is why I was surprised when I painted the watercolor on and it absorbed immediately into the paper!  Normally you can spread the paint around easily.  I have hand-tinted MANY prints in the past without a problem.  This time the watercolor was not only absorbing fast, but the paper was bubbling up in a bad way.  After I painted the print I thought it was ruined.  It was so puckered.  I was not enjoying the rough road!

I ended up spraying the back side with water and pressing it overnight.  Luckily, in the morning, it had flattened and everything was OK.  Phew!
    
FRAME

The final step was to frame the print.  The size was a little too big for the mat that came with the frame, so I cut a mat to fit the image with the signature.  I can't tell you how many times I have made an image to fit into a store-bought frame and forgot to compensate for the added height of the title and signature.  This time, I bought the frame after the print so I knew I was going to have to cut the mat.  In the end I think he framed up rather well.

Of course, all of this didn't happen the day of Mark's birthday because I woefully underestimated the amount of time it would all take.  But I presented Mark with a test print on his birthday and about a month later gave him the framed print. 

I have mentioned my neighbor Mark numerous times on this blog.  He is my neighbor who has every wood-working tool you can imagine and who has helped on MANY of my projects.  He never hesitates when I text or call him with a crazy idea...and often spurs me on to make them even more difficult!  I am deeply grateful for all his help and time.  A big thank you and HAPPY BELATED BIRTHDAY!!!    

One who finds a faithful friend, finds a treasure.
—Jewish Proverb


Wednesday, May 14, 2025

Shooting Star Linocut


“What are we but shooting stars,
hoping to shine long enough
to make at least one soul believe in the magic.”
― Sherry Namdeo

INSPIRATION

I am a member of a local printmaking group called Tiger Lily Press, and each year we have a members' show where we can submit two framed pieces.  I knew I wanted to submit my framed "Magnolia" print, but I also wanted to make a new piece. As I usually do, I opened up my ENORMOUS file of plant photos to see what caught my eye. 

Below you can see I chose a plant I photographed in May of 2015 at Miami Whitewater.  I specifically remember we were on a bike ride around the loop, and we stopped under the big oak tree where they have a picnic table to rest.  I was wandering around looking at plants when I spied this unusual beauty.  Its name is "Shooting Star", and it is a native prairie ephemeral.
SKETCH

I begin every print with a sketch.  I usually do a light tracing of my photo, and then alter it according to my taste.  This time I felt like I wanted to beef everything up a bit.  I remember I was staring at my sketch when my neighbor Joe came up the stairs, and I showed him the sketch.  Joe is a package designer and also a talented printmaker.  As he was walking down the stairs I thought, "What would Joe do to make this better?"  What came to me was to not only beef it up, but to make it more angular.  Below you can see my starting sketch and where I ended up.

TRANSFER TO PLATE

Once the sketch is completed it is easy to transfer it to the plate.  I simply flip it over and rub with a credit card.  
CARVE

Once the design is transferred, it is time to carve!
Carving is my favorite part of the entire process.  Below you can see the finished carving.  I like how the plate looks when I carve the large expanses with the same v-gouge that I use for the subject.  It gives the appearance of energy or vibration lines coming off the plant.  An efficient person would just carve the expanses with a large flat u-gouge.  It was probably not the smartest thing to do right now as I am trying to get over tennis elbow.  But I REALLY like to photograph the plate with all its "energy" lines at this stage.


Check on the goals you have set for yourself...

Make sure your vision is charged with desire.
We get the word desire from the Latin de sider, meaning “of the stars.”

Unless your vision is charged with desire,
you have lost touch with your star and are bound to go astray.

But if your desire is fully invested in your vision,
then you cannot help stirring forces in the world to support you.

— Robert Moss


Below is a 60-second timelapse video of the carving process. (Music by Dmitri Kolesnikov from Pixabay)


CLEAN PLATE

For ten years I have cleaned the plate the same way before printing.  I normally use vegetable oil to remove the pencil from the plate.  You don't have to even clean the plate if it is a one color black print (which this is).  But if you print with lighter colors, like yellow, the pencil will sometimes show on the print.  
I just happened to be carving upstairs in the computer room, and the thought popped into my head, "Why don't we try cleaning with acetone?"  Sometimes the vegetable oil gets stuck in the grooves, and I have to use a Q-tip to clean the grooves so it won't leave an oil mark on the paper.  I figured acetone would just evaporate.  And I knew I had some fingernail polish remover just a few steps away in the bathroom closet.  I even googled it to see if other people used it as a cleaner, which they did.  But I couldn't specifically find anything about using acetone on safety-kut.

Below you can see it cleaned up beautifully.
DISASTER STRIKES

The day after I cleaned the plate I went downstairs to print in the studio.  I pulled a test print, and then my sister called.  I briefly looked at the print and had a funny feeling something was wrong, but I couldn't study it in that moment.  And after I finished talking to my sister I was on my way to dinner with my neighbors.  When I returned home I studied the situation and was so sad...the acetone had eaten away the linocut material.  When I was cleaning the plate I had noticed there was some very tiny "dust-like" particles on my paper towel, but I figured it was maybe part of the pencil carbon.  Unfortunately, it was the plate dissolving.  For those printmakers out there, DO NOT USE ACETONE ON SAFETY-KUT! (or Speedy Carve or Soft Kut)
When things like this happen, which is not that uncommon in printmaking, it takes me a while to adjust to reality.  With all my "zen" training and meditation, you would think I could just accept it and move on.  I do think I have improved somewhat in that regard, but it still takes the wind out of my sails for a bit.  I think I took a week off before I could stomach starting over again.  

RE-PRINT

I can also tell that I was "all business" because I took no photos of the re-carve.  The first time I carved the plate I went slowly to not irritate my elbow.  But the second time I went a little quicker and felt it in my forearm.  George graciously offered to help me print (to give my arm a break), and we had a successful day.  Below is a 60 second video of our efforts. (Music by Mykola Odnoroh from Pixabay)
 

Although we only printed five, the edition will be a variable edition of twelve. I plan on printing seven more on different kinds of paper. 

CHOP SIGNATURE

Once the prints were dry it was time to add a chop signature.  I don't add a chop on every print, but I especially like to on black-and-white prints to add interest.  

The scientific name of the "Shooting Star" is Dodecatheon meadia.  When I looked up the meaning I learned that Dodeka means twelve, and theos mean gods.  Hence it is known as the "Flower of the 12 Gods."  In honor of that I decided to add a twelve-sided flower chop.  I designed the chop in Illustrator as you can see below.

Once I completed the design I had to decide if I was going to carve it myself or order a rubber stamp.  In the past I have tried carving my own (you can see my attempts in my Pigsqueak post), but I couldn't get it to be as crisp as I liked.  As the show was quickly approaching I chose to order a rubber stamp from Hathaway Stamps in downtown Cincinnati.

Unfortunately my order took way longer than I expected, and I only got the stamp three days before my print was due at the show.  Also, for some reason, red ink takes a long time to dry.  But I added a new wax drier to the ink...plus I "cooked" two of the prints in the back of the car.  The heat greatly speeds drying time.  One might also ask, why use oil-based ink instead of a stamp pad which would dry faster?  The answer is the stamp pad ink is not as vibrant.  But luckily the wax additive and "car cooking" worked their magic...everything was dry the day before it was due, and I was able to frame the print!    
Below is a video of the nerve-wracking process of adding the chop! (Music by Ievgen Poltavskyi from Pixabay) 


CONCLUSION

Whenever I make a print of a plant I always research any folklore or medicinal uses, and I am always amazed at what I learn.  This time, the "Shooting Star" took me on an unexpected journey back in time to encounter a brilliant, ancient being.  As I mentioned above, the genus of "Shooting Star" is Dodecatheon, which means "twelve gods."  The flower is in the family Primulacaea, and it has been suggested that primroses were under the care of the twelve superior gods of Olympus (Lake Forest College).  When I read this I was curious to know "who were the twelve superior gods of Olympus?"  As I read the list of Greek gods and goddesses nothing in particular caught my attention.  That is until it occurred to me to ask, "Is there a Greek god or goddess of shooting stars?"

Why of course there is!  And her name is Asteria.  She "was the Titan goddess primarily associated with falling stars and was also connected to nocturnal divination, including astrology and oneiromancy, the interpretation of prophetic dreams" (Theoi).  At the time I was researching this, I just so happened to be taking Robert Moss's course, "The Power of Active Dreaming" where we were exploring the vast potential of using dreams as guidance in our lives. And my sister had just loaned me the book "The Night School: Lessons in Moonlight, Magic, and the Mysteries of Being Human" by Maia Toll.  I am about halfway through this mystical book that takes one on a creative journey into the mystery and magic of the night.

If this wasn't enough to shoot me over the moon, my jaw dropped when I read Asteria's story.  Asteria was beloved by Zeus, but she rejected his attentions.  He pursued her in the form of an eagle. To escape him, she transformed into a quail and jumped into the sea, becoming the island of Delos (Wikipedia)

When I read this story I was just at the point of designing the chop for this print.  I first sketched a twelve-sided star with a quail inside.  Then, playing around with the idea, I reversed it and sketched a quail with a twelve-sided star inside it.  Both sketches were too detailed for a little chop signature, and I abandoned my sketches for the simpler twelve-sided flower.
But when I saw the sketch of the quail with the star on his chest I realized it resembled the main character in my recently published book "Little Bird and the Quest for Happiness!  The same day I was researching Asteria I just so happened to be adding an inspiration section to the end of the book and was writing about a bird with an insignia on his chest.  In my book, the symbol represents the idea that we all contain something magnificent inside us...indeed that we are each one of us magnificent. 

When I get repeated synchronicities like these I slow down...I pause...and listen.  At first I thought I was supposed to name the print "Asteria."  But then I realized people would not know the back story.  They wouldn't know the scientific name and all the references to the Greek gods.  I also thought they might get the name Asteria confused with the genus of flowers named Asters.  So I kept the name of the print, "Shooting Star."  

But listening further, I am left with a feeling that one gets when you see a "Shooting Star."  I feel lucky.  I feel like the universe is very much alive and is reaching her beautiful tendrils and sprinkling stardust into every facet of my life.  Whether I see a shooting star blooming at the prairie's edge or blazing across the vastness of the night sky, it is a very good sign.  When the goddess Asteria reaches her shimmering hand through time and plants a spring ephemeral in my path, I take note!  Her transformation into a courageous little bird (and eventually into a sacred island) is an inspiration that steadfast bravery can defy even the greatest of powers.  I receive all of these synchronicities as a message to keep following my intuition, to connect with the extraordinary through the ordinary, and to be astounded by the mystery of it all. 
“CALL YOURSELF

Look deep in the mirror
And say: 'I LOVE YOU'
And immediately
An electric current will
Ripple throughout your soul
And burst through your eyes
Like shooting stars
Dancing across the skies
In ecstasy.
To tell your soul you love it -
Is like remembering
WHO YOU ARE
After being in a coma
For a hundred years.
Your face will beam the light
Of a hundred galaxies.”
― Suzy Kassem

**********


The "Shooting Star" is now available for purchase on my website, Nessy Press! Also, the Tiger Lily Press Members show opening is this Friday, May 16, 2025 from 6-8pm at the Clifton Cultural Arts Center.  The exhibit runs through Jun 13.


Tuesday, May 6, 2025

Quilling


Last Sunday my friend Amy asked if I wanted to try quilling.  I had never tried it before and she said she had just bought a kit with all the supplies.  So she came over and we spent the afternoon twirling paper around a metal pin.  

After you wind the piece of paper, you can create different shapes with the tightly spun circle.  I ended up just making these eye-shaped pieces by gently squishing the circle and then gluing the end of the paper back to itself.  Amy had a great glue dispenser that basically dispensed glue through a needle so it was easy to apply to precise areas.


I had so much fun playing with my shapes after they were made.  At first I thought I was going to make two butterflies with the red, yellow and orange pieces.  But after playing around with it I decided to make some green leaves to create a flower.


I realized it had been a long time since I learned a new craft and spent the afternoon just relaxing and fiddling around.  I realize I can be a bit "tightly wound" when it comes to making art in general.  I don't often let my hair down and just play.  But as I watched my friend Amy finish a graduation card and move right on to making a quilled tree, I was inspired and reminded of the joy of it all.  


"Creativity is not the possession of some special talent.
It's about the willingness to play."
— John Cleese