

With flower nectar and milk-laden leaves
Who nourishes the Monarch?
Mother Milkweed
INSPIRATION
In September of 2022 I received an email from the Weaver's Guild Exhibition Committee asking if I would be interested in having a solo show. Of course I said, yes. And then they asked if I might be able to make new work that had embroidery incorporated into the pieces, like one they had seen of mine in a previous show. At that point I had only ever made one piece with embroidery. It was a piece called "The Weaver" which you can see here. I remembered it was a little difficult to sew that piece, but figured it was because the piece was so large. I have always been interested in combining different materials and thought this would be a good chance to do so on a smaller scale.
When I started brainstorming about what plants might lend themselves naturally to having embroidered elements, the milkweed plant was the first thing that popped into my head. I could picture using either the real seeds or embroidery thread to depict the silk parachutes blowing in the wind. So in October George and I went for a walk at Winton Woods dam to look for photo references.

SKETCH
I ended up combining a couple of my photos in Photoshop to get the composition I wanted and then drew my sketch. Below is a closeup of the first seed pod.

And here is the final sketch on tracing paper.

TRANSFER
The nice thing about using tracing paper is that you can flip it over and rub it with a credit card to transfer the image. Below you can see the image transferred nicely onto the Safety-Kut plate.
CARVING
The carving is always my favorite part. I love my flexcut carving tools and am slowly getting to know my fancy "Sankaku To" Japanese v-gouge.


I recently invested in a tabletop Ott light and it makes a world of difference. Below you can see with light and without.

Once I am done carving the design I usually cut away the excess plate so it will not catch any ink and cause extraneous marks. It is best not to cut too much away or the plate becomes too wonky and will stretch while burnishing.

This video shows the carving process and has a fun song, so turn on your volume!
(Music: "Yummy Yummy" by Lesfm from Pixabay)
TEARING PAPER
For this project I decided to try a new paper. Instead of my usual Stonehenge paper I bought Nepalese Lotka paper. In December 2022 I took a chine collé class at Tiger Lily Press and my teacher, Maureen George, showed us how to tear this type of paper using water. In the video below I show this process.
In the end I did love the look of the deckle edge. But I failed to press the paper well after tearing and every piece curled. I still have a big stack of prints that I need to spray the back of and press. So if you decide to go this route, be sure to press your paper plat before it dries!

I love how the plate looks with wet ink on it.

I couldn't resist including this photo because it shows my two helpers. George always jokes that we should have named the studio "Cat Hair Studio."

PRINT

Below is a closeup of the double pods.


I ended up lowering the number to three seeds.

SEWING

Here you can see the print after hammering the holes and before sewing.

Below is a photo of my first sample seed. I wasn't sure how it was going to go, but I did know that I wanted to attempt to have a slight curve on the lower threads. I started by sewing the lowest holes first. Then when I sewed the holes above it, I "grabbed" the lower thread. I was hoping they would make more of a curve, but I think the effect was better than sewing straight lines from the middle to each hole.


FRAMED

SHOW
For the show at the Weaver's Guild I made a label for each print with pertinent information and a couple of quotes that I felt went with each piece.

As most of you know if you read my post about the show, I have been especially drawn to Buddhism in recent years. But I have never written much about my Catholic upbringing. If I had to choose one thing that resonated with me from my time going to church all those years, it would be the Virgin Mary. I remember there was a statue of her at the front of the church. I loved to look at it. It was a statue of her in her blue robes with her arms down at her sides. I thought she was beautiful and liked to think I could feel love emanating from her. I didn't know it then, but the subject of the Divine Mother has come to fascinate me. I love reading about the subject and all of her various forms.

The "Milkweed" print is now available at NessyPress.com.
PRINTING
Lately I have found it is helpful to pick a color swatch from my Sherwin Williams fan deck or my giant box of paint swatches I have collected over the years. This color then serves as a guide when I mix the ink. It is best if I mix the color the day before printing, but it rarely happens. I usually end up trying to mix the color the day of printing and spend at least the first hour trying to get the perfect color. Then I begin to feel stressed because it has been over an hour and I haven't even printed yet! This time was no different. Below you can see my printing set up.

I love how the plate looks with wet ink on it.

I couldn't resist including this photo because it shows my two helpers. George always jokes that we should have named the studio "Cat Hair Studio."

In the following video you can see the printing process from start to finish.
(Music: Inspiring Ambiance by Scott Holmes)
I was very happy with how the print looked on the Nepalese Lotka paper. I experimented with using both sides of the paper. Most of the prints were on the smooth side, but there were probably a couple on the rough side. I liked both, but the rougher side is harder to print as you have to burnish harder to make sure of an even print. The print below was on the smooth side.

Below is a closeup of the double pods.

SEED MATERIAL
I haven't mentioned yet that part of my inspiration for this piece was randomly walking into a spinning demo by Pat Maley at the Weaver's Guild. Pat was spinning cotton and showing people how to extract the cotton from the seed pod. She also mentioned flax and showed different examples of the final threads you can get with both. It got me thinking about perhaps using the real milkweed seeds in my piece, or maybe using flax thread.
I collected seeds and pressed them for a couple months. I even experimented with dipping them in liquid "YES" paste and then pressing them between wax paper. That experiment failed when I realized the threads of the milkweed were too thin and the paper glued together. Luckily I also pressed lots of them without the glue. Below you can see them laid out onto the print.
I collected seeds and pressed them for a couple months. I even experimented with dipping them in liquid "YES" paste and then pressing them between wax paper. That experiment failed when I realized the threads of the milkweed were too thin and the paper glued together. Luckily I also pressed lots of them without the glue. Below you can see them laid out onto the print.

I liked how they looked but realized the threads would not be as visible as I wanted... especially if I glued them flat. Plus, at this point I was firming up the idea that the common "thread" woven into all the new work for the show would be "regular" embroidery thread.
Also, as an extra bonus, I was starting to have an additional goal of weaving mystical elements into the pieces if possible. I originally bought the Virgin Mary beads for some little maple helicopter seeds I printed in my chine collé class. I thought I would use them as the seed heads. Instead, I ended up making two large maple helicopters so I put the beads aside. When I let go of the idea of using real milkweed seeds I knew the Virgin Mary beads would work perfectly. I didn't know how perfectly until I saw them side by side! It felt like the universe had worked some pretty amazing magic!
Also, as an extra bonus, I was starting to have an additional goal of weaving mystical elements into the pieces if possible. I originally bought the Virgin Mary beads for some little maple helicopter seeds I printed in my chine collé class. I thought I would use them as the seed heads. Instead, I ended up making two large maple helicopters so I put the beads aside. When I let go of the idea of using real milkweed seeds I knew the Virgin Mary beads would work perfectly. I didn't know how perfectly until I saw them side by side! It felt like the universe had worked some pretty amazing magic!

SEED PLACEMENT
When I first envisioned this piece I thought I was going to have five seeds blowing away in the wind. Below you can see my playing with that positioning.

I ended up lowering the number to three seeds.

SEWING
Part of what helped me make the decision to have three seeds was making a sample embroidered seed and then scanning the print and my sample into Photoshop. It then became clear that three seeds was all I could fit. It was also very helpful to print out my Photoshop mockup onto a transparency. I then used it as a guide to make the holes before embroidering. Below you can see the transparency with my hammer and awl.
Here you can see the print after hammering the holes and before sewing.

Below is a photo of my first sample seed. I wasn't sure how it was going to go, but I did know that I wanted to attempt to have a slight curve on the lower threads. I started by sewing the lowest holes first. Then when I sewed the holes above it, I "grabbed" the lower thread. I was hoping they would make more of a curve, but I think the effect was better than sewing straight lines from the middle to each hole.

FINAL PRINT
The best photo I have of the final print was taken on this plastic grid.


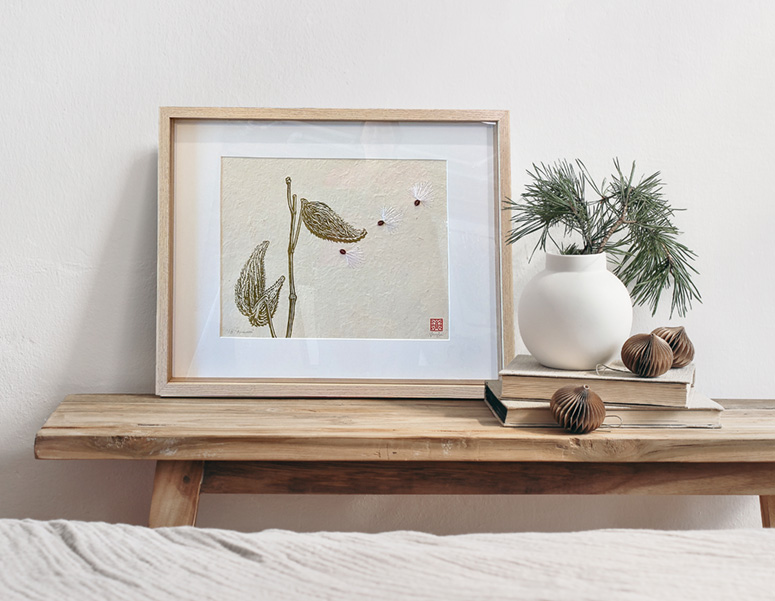
FRAMED
Finding a frame that would accommodate three-dimensional objects was a bit of a task. I finally ended up purchasing frames from Wayfair that had a nice built-in spacer. I would never have known they had it from the description on the website, but luckily my neighbor had bought some and I saw them in person. It is possible to add your own spacers, but sometimes the frame is not thick enough to fit the extra depth. Weirdly, Wayfair accidentally sent me MANY extra frames...so I will be offering framed prints on the website.

SHOW
For the show at the Weaver's Guild I made a label for each print with pertinent information and a couple of quotes that I felt went with each piece.

As most of you know if you read my post about the show, I have been especially drawn to Buddhism in recent years. But I have never written much about my Catholic upbringing. If I had to choose one thing that resonated with me from my time going to church all those years, it would be the Virgin Mary. I remember there was a statue of her at the front of the church. I loved to look at it. It was a statue of her in her blue robes with her arms down at her sides. I thought she was beautiful and liked to think I could feel love emanating from her. I didn't know it then, but the subject of the Divine Mother has come to fascinate me. I love reading about the subject and all of her various forms.
One of my original ideas for the show was to convey the idea that the miraculous is everywhere if we only have eyes to see it. When I saw how real milkweed seeds all appear to be stamped with her form it made me ridiculously happy. I love the idea that "All forms are the Mother." If we can't find her in a plant called "milkweed" than I don't know where else to look.
Expand the word, "Mother"
Let it emcompass the hills,
the morning,
that which feeds you.
Mother is much too big a word
for one person alone to hold.
Take it off her shoulders,
Hand it to community,
warm baths, anything that soothes and restores.
Healing is learning to know where to find The Mother
in her myriad forms
whenever you need her.
—Chelan Harkin, Susceptible to Light


No comments:
Post a Comment