Thursday, September 19, 2019

Bringing Field Sketches Home


Last week I attended John Muir Laws' Wild Wonder Nature Journaling Conference at Asilomar, Pacific Grove, California.  Asilomar has a gorgeous campus right on the beach and the week was full of nature journaling classes both in the classroom and in the field.  I took mostly field sketching classes where we would sit in a location and sketch for about 30-60 minutes.  When I was finished sketching I was some times pleased with what I had drawn, but very often felt my drawings could have gone farther had I had more time.  And at the end of the class when everyone laid there sketches out for viewing, I could see elements of other's work I wanted to try.

The subject of "finishing" field sketches is quite controversial.  Some argue that the sketch is not meant to look "pretty" but that it simply serves as a way to note field markings and other pertinent information that cannot be gleaned without actually seeing your subject.  Others like to have the rule that a true sketch should only be done while sitting in the field and that photos flatten and distort the subject.

But I personally have found that "finishing" field sketches is an invaluable way to improve my skills.  I like to challenge myself to see if I can get any of the sketches to a place where I like them. It is my way of spending more time with my subject and allows me to explore new techniques.  To me it is fantastically fun to pull out my sketchbook and watercolors, turn on some music and color in my drawings like a child with her coloring book.  I truly find this process to be both relaxing and exhilarating at the same time.  I do see great value in sketching from life.  Nothing can replace it.  But I also think there is much to be gained in playing around.  So don't be afraid to muck around with a field sketch and try some new things.

“This is the real secret of life -- to be completely engaged with what you are doing in the here and now. And instead of calling it work, realize it is play.”
― Alan Watts

After years of color correcting images in Photoshop I realized there are always a few things that I do the same when I look at any photo or artwork. Below are my top ten tips for "finishing" field sketches.  I would love to know of other's strategies for this process so please leave me comments if you have other suggestions.


Some people also argue that a sketchbook should be ugly.  There should be scribbly notes, out-of-proportion drawings, and messy attempts. And those who do not have these items are vain, afraid of criticism, or worse..."perfectionists".  The perfectionists are people who imagine their sketchbook being opened to people laughing and jeering at the childlike images while chanting "she can't draw!"  That scenario makes me laugh just typing it, but don't we all have these fears?  I will admit that there is an element of vanity in this "finishing" work, but there is also an incredible amount of juicy fun to be had.  So I encourage you to do this only if you think it is fun.

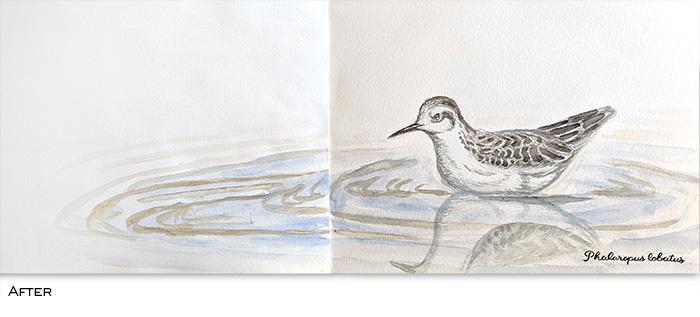
RED-NECKED PHALAROPE

The idea for this post started because my friend Jodi teased me that I wouldn't show my "ugly" bird on the blog (my words, not hers).  It made me pause to think about why we don't like to show our field sketches and what would be helpful to me and others. The phalarope below is a perfect example of what can be learned from working on a sketch at home.  While in the field I was able to see this red-necked phalarope through the scope for 10-20 second at a time.  I thought I did an OK job at getting some field markings in before some dogs came and scared it away.

But when I got home and pulled out my field guides and images on google, I could see I had the shape of the head wrong.  This bird has a tall forehead that looks like it has been smacked with a flat board.  I was able to add some height to the head and if I ever have to draw a phalarope again I won't make the same mistake!  I was also able to refine the feathers, study the shape of the bill and how it connects to the face, and even try making a shadow in the water!  This took about 30-45 minutes and was so much fun!     


POINT LOBOS

The class I took with John Muir Laws was one of my favorites.  It is rare to meet someone who is an incredible naturalist, amazing artist, AND a phenomenal teacher.  During his class we took a trip to Point Lobos State Natural Reserve where he encouraged us to try either drawing an entire landscape in a small rectangle, or to draw the outline of the landscape and then color rectangular portions of that landscape.  I attempted the latter but ran out of time to finish the color before we had to meet back to show our work.  When Jack saw mine he said he would leave it just like it was to show the process.  I could totally see what he meant, but the thought of it made me squirm inside because I was DYING to see what it would look like finished!  Wild dogs couldn't keep me from filling in that last bit of color!


As a side note, my original plan was to put the Point Lobos logo in the circle.  But after I finished coloring in the rectangles I changed my mind.  I decided I just wanted to put the color of the waves and water in the circle.  After I finished it looked kind of plain so I penciled in a little sea lion (lobo marino means sea lion in Spanish).  We had seen them off the point that morning and even though I didn't see one while sitting there I couldn't resist because I friggin LOVE sea lions!  (It just occurred to me that tip number 11 should be "Don't be afraid to add elements to your sketch that weren't there but that help you get a sense of place...in other words...put a bird on it! or a sea lion!)

ABRONIA

This sketch is a perfect example of trying something, but liking it the way it was to begin with.  I knew I kind of liked this fleshy plant just like it was...sketchy and soft.  But I also knew it would pop more if I inked the outlines.  Once an idea springs in my head it is hard not to do it.  The solution to this dilemma is to always take a picture first.  That way you can have your cake and eat it too.


OAK FOREST

This was one of my least favorite sketches and I wasn't really interested in fussing or playing with it.  So I left it alone.


GIANT SEA KELP

Sadly, the Giant Sea Kelp is another example of a sketch where I liked the "before" better than the "after."  But I learned so much from this process.  I have been struggling lately between leaving my sketches as just watercolor or inking them in.  I find that inking them in is an easy way to distinguish elements but that it turns out more cartoony.  It's not that cartoony is bad, but it is just a whole different look.  I find that through this process of "going too far" I am learning when to stop.  I did at least get to try splatter painting the sand in this one.


This sketch was done in a class by Catherine Hamilton on "Improving Live Drawing and Color Perception Skills."  If you ever get a chance to take a class with her DO IT!  She is incredibly knowledgeable and you must follow her on Instagram (@birdspot).

ASILOMAR DUNE MAPPING

During the conference I signed up to take a class on making maps with Emily Underwood.  We were led up to a bluff overlooking the dunes with a boardwalk.  Unfortunately the fog was rolling in and we could barely see so we had to use a bit of imagination.  I wasn't that into my sketch, but while I was sitting there I had the thought it would be cool to add a compass rose.  I had so much fun drawing it but after I added it I thought it was a bit too heavy for the drawing.  I then tried to thicken the dune lines which I quickly regretted.  The only extra bit that I did afterward that I liked was to add shadows to the plants.  Again, this one might have been better left alone, but next time I do a map I will know to keep the compass rose light.


SPHINX MOTH

This was a fairly quick sketch of a moth I did while in the "How to Draw Insects" class by Stephanie Dole .  Sometimes when I have a photo or a drawing that is fairly unremarkable I like to add text to it to spice things up.  Adding type to images often has a magical effect.  Since this moth was very muted in its color scheme I decided to leave it un-inked and to do the text in watercolor pencils.  In my humble opinion, the text really helped to add interest to this image.


Also, just a note that you can get so many free fonts now.  I like to use dafont.com.  I have never liked my handwriting and it has lead to a love of fonts.  If I am being particular I will print it out, pencil the back of the paper, and then trace it to transfer the type.  If I am being ridiculously particular I will scan the image, drop the text in, and then print and transfer to my sketch.  But last year when I was in Guatemala I didn't have access to any printer so I ended up just looking fonts up on my phone and drawing them onto my sketchbook.  Going through all of these various processes has made me more confident in drawing type.

OBI KAUFMANN

While taking a class from Obi Kaufmann I did a quick sketch of him doing a watercolor demo.  I liked the simplicity of just adding a small line of text for his name.  Also, after checking the reference photo I added a little red to his necklace which made me happy (oh, the little things!).


ASILOMAR STATE BEACH

This last sketch is a perfect example of darkening the darks and increasing hue saturation.  After the class everyone laid their sketchbooks down on the sand and I noticed one woman's work was stunning.  I also noticed she had beautifully darkened the rocks where the water touched them and where the shadows were darkest.  In my mind I noted it and decided that if I returned to this sketch I would do the same.  I also noticed that some people had captured the waves perfectly.  I had essentially left a white space for the waves because I wasn't sure what to do.  At first I tried darkening the back of the wave.  Then I tried dry-brushing a curve but didn't like the detailed look with the rest of the sketch.  Then I realized that a wave is just a cylinder on its side and tried to smooth it all out and shade it like a tube.  I am not sure I hit the nail on the head, but wow was it good practice drawing water!

The final element I added was the second circle in the sky.  My friend Jessica always makes these incredible circles in her skies and I love them.  My first circle was a happy accident from my plastic water cup.  So this morning I tried to make a circle with a water glass.  It wasn't quite as perfect but was as fun experiment.


In some sense there were winners and losers with these "befores" and "afters."  In certain sketches I made improvements here and mistakes there.  But if you consider all of my mistakes as learning opportunities then I think I won lots of prizes.

In addition to the technicalities of improving my watercolor skills, the most important thing I have learned through this process is discovering what I like.  I consider art as a process of learning about myself.  What subject draws me in?  Do I like the color darker or lighter?  Do I want this line thinner or thicker?  Should I add highlights?  And the beauty is no one can answer those questions but me.  In other words, what makes me happy?  What makes my heart sing?  I believe art is a way of finding what brings you joy and if we could all do that what a wonderful world it would be. 

"I see trees of green, red roses too
I see them bloom for me and you

And I think to myself what a wonderful world


I see skies of blue and clouds of white
The bright blessed day, the dark sacred night

And I think to myself what a wonderful world"

Songwriter, George Weiss, Robert Thiele

Monday, August 26, 2019

Sea Shell Collecting


Imagine a late summer's day spent on the back porch sorting sea shells from your trip to the beach.  A perfect day in my opinion, and I got to do just that this week.

I collected all of these shells on our trip to Isle of Palms, SC this summer.  One of my absolute favorite activities was to walk up to the top of the island where the inlet waters flowed between our island and the next.  The first day I walked I started to notice I had a definite preference for three types of shells, Lettered Olives, Moon Snails, and Channeled Whelks.   (I didn't yet know their names, but my friend Melissa lives in Charleston and she politely told me their names over and over.)


There is something truly magical about shells.  If someone had told me when I was a child that there was a place you could go where the universe deposited new, incredibly beautiful treasures every single day and that anyone could just go and pick them up, I wouldn't have believed them.  Think about it...every single day totally unique works of art are left by the ocean.  Not only do their smooth bodies feel lovely to the touch, but their spiral forms are truly stunning.

“The world is full of magic things,
patiently waiting for our senses to grow sharper.” 

― W.B. Yeats


As I sorted the shells I had so much fun choosing different combinations of color and form to photograph.


Of course, it wasn't just me who was interested in the shells.  I had a very curious helper who had to smell all the shells.


The Moon Snail was one of my absolute favorite types of shell.  It is also called Shark Eye and the animal that used to live inside is a marine snail that eats bivalves by boring holes into their shells and then digesting the contents.  I LOVE the smooth surface and round shape of these shells.  Plus this shell is all about the perfect spiral.


Correct me if I am wrong, but I think the shell below is a knobbed whelk.


The two photos below contain Lettered Olives.  I could have spent a LONG time photographing just this type of shell.  I love the open "mouth" hole at the tip of some of them and imagine them emitting some sort of lovely ocean tones when they crowd around together to sing.


Midway through my photoshoot, yet another helper came to investigate.


Below is a photo of a sea urchin shell.  I wasn't sure what species it was, but love the radiating nubs.


The photo below is the only shell I collected from a crab.  I thought the spotted pattern on its back was stunning and the round shape of its body so interesting and balloon-like.


The theme of this blog is about noticing the beauty and magic that surrounds us everyday.  And if I had to come up with the perfect example of this it would be shells.  The very act of collecting shells is a practice in noticing what draws you.  What is it you love?  Do you like the smooth or rough texture?  Grey or pink shells?  Tubular or shallow?  Open or closed?  As I walked along the beach, a smooth spiral would catch my eye from a distance.  I would alter my path and make my way over to it to see if it had what I considered to be the perfect combination of elements.  And therein lies the beauty of collecting.  No one else can tell you what you love...you just know.


The universe buries strange jewels deep within us all,
and then stands back to see if we can find them.

— Elizabeth Gilbert

Thursday, August 1, 2019

The Weaver - Linocut Embroidery


“Who is She? She is your power, your Feminine source.
Big Mama.
The Goddess.
The Great Mystery.
The Web-Weaver.
The Life Force.
The first time, the twentieth time you may not recognize her.
Or pretend not to hear.
As she fills your body with ripples of terror and delight.

But when she calls you will know you’ve been called.
Then it is up to you to decide if you will answer.”

― Lucy H. Pearce, Burning Woman 


“My Mother is both within and without this phenomenal world.
Giving birth to the world, she lives within it!
She is the Spider and the world is the spider's web that she has woven.
The spider brings the web out of herself and then lives in it.”

― Sri Ramakrishna, The Brahmavadin

The Idea

Ever since I made this print I knew I wanted to embroider something in the dark cavities of the acorn caps.  I also knew I wanted to embroider something with lots of arms to play off of the many arms of the acorn caps.  So when I was thinking about many-armed options, the Hindu goddess Durga came to mind.  I have been fascinated by this goddess ever since I had a dream about an eight-armed green goddess that both held and destroyed me with those arms.  Durga is the feminine Creator and Mother of the universe.  She both created and pervades the known universe.  Hence every form in existence is, in essence, her body.

When I was thinking about what to put on the opposite side I came across the second quote from above that describes the Mother of the universe as a spider that both creates and lives in the world.  The metaphor was beautiful.  Plus, I loved that it referenced yet another eight-armed being and the obvious connection to the medium of embroidery thread.

As I was playing around with the idea of a web I also recalled a beautiful story about the Jewel Net of Indra.  As described in the quote below, at each node of Indra's web hangs a beautiful crystal.  And each crystal reflects every other crystal so that a change in one reflects a change in all.  I love this idea that we are all infinitely interconnected.


“Far away in the heavenly abode of the great god Indra, there is a wonderful net which has been hung by some cunning artificer in such a manner that it stretches out indefinitely in all directions. In accordance with the extravagant tastes of deities, the artificer has hung a single glittering jewel at the net’s every node, and since the net itself is infinite in dimension, the jewels are infinite in number. There hang the jewels, glittering like stars of the first magnitude, a wonderful sight to behold. If we now arbitrarily select one of these jewels for inspection and look closely at it, we will discover that in its polished surface there are reflected all the other jewels in the net, infinite in number. Not only that, but each of the jewels reflected in this one jewel is also reflecting all the other jewels, so that the process of reflection is infinite . . . it symbolizes a cosmos in which there is an infinitely repeated interrelationship among all the members of the cosmos. This relationship is said to be one of simultaneous mutual identity and mutual intercausality.”

―  Francis H. Cook, Hua-yen Buddhism: The Jewel Net of Indra

After researching Indra I also discovered Indra was considered the king of heaven and one of his main symbols is the thunderbolt.  The thunderbolt is also called a vajra.  When I looked up vajra on Wikipeida it described it as "a weapon used as a ritual object to symbolize both the properties of a diamond (indestructibility) and a thunderbolt (irresistible force); the Sanskrit word has both these meanings."  It "is considered as one of the most powerful weapons in the universe" and is used to cleave through ignorance (britannica.com).  As you might imagine, I was very excited when I realized I could buy a vajra bead!

One last side note about Indra!  I also found out that his female counterpart in some traditions is a goddess called Tripura Sundari.  This goddess is considered one of the ten divine facets of the Divine Mother.  I liked the idea that the embroidery on the two acorn caps would reference both male and female.  Because we live in a world of duality it seemed appropriate to have both.  Because herein lies the beauty and the struggle.  Between apparent opposites lies a tension, a magnetism, and the mystery.  And the presence of one is often the doorway to the other.  Out of darkness comes light, out of nothingness comes abundance, and out of oneness comes duality.


The Embroidery


Embroidering on paper is different than sewing on fabric because you can't just push the needle up through where you think it might need to go.  To embroider on paper it is necessary to plan exactly where the holes will be ahead of time.  In the sketch above you can see where I planned the location each hole.  The following video shows the process of making each hole with an awl.


After making all the holes it is then possible to embroider through the paper.  It was a bit difficult to embroider such a big piece of paper because I had to keep flipping half the paper over and under my arms to pull the needle through.


I was inspired by images of string art I saw on Pinterest to try making the "green void" with a slightly more difficult stitch.  I don't know the exact name of this stitch but instead of sewing directly out one hole and in the next, each thread is caught and pulled by the thread before it before it enters the paper.  It somehow seemed a more appropriate stitch for a void.


I also wanted to try using a center ring instead of a hole for the hair of the goddess.  The center ring is only held in place by the tension of the threads across from it.


The Framing

Because framing such a large piece would cost an arm and a leg I decided to try and frame it myself.  I am a detail-oriented person, but I think framing takes a special kind of precision.  My hat goes off to all the framer's of the world.  My hat also goes off to my neighbor Mark who let us use his amazing Festool miter saw even though he was not feeling well.  Thank you!!!

In order to build the frame I purchased a Logan studio joiner which inserts v-nails into the back corner of the frame.  It was very satisfying to pull down the lever that inserts the nail.  Here is a video of that process.


Below is a photo of the Logan clamp and George and me holding the giant frame.


The day before I was supposed to drop the piece off I was cleaning the front of the plexiglass when I noticed a rather large beard hair (and several cat hairs) beneath the glass.  My heart sank.  George and I just spent a month making this thing and it turned my stomach to think about opening it up.  But I quickly ran through what was necessary to get the hair out. . . remove hanging hardware, cut off paper backing, unscrew the offset clamps that held it tight, pull out the foam core, and remove the hair, put everything back together and re-glue the paper and re-place all hardware.  I figured it would take about two hours.  Instead of focusing on how long it took us to build the frame and that we might ruin the whole thing, we focused on the two hour task at hand.  We took the frame to my neighbor's cat-free house and project hair removal was successful! (Thank you John!)


The Weaver

When I was thinking about naming this piece the first title that came to mind was "Duality."  I liked the reference to the two acorns and spirituality.  But I also liked the name "Poly" which played with the idea of having many arms and many facets.  In the end I went with the "The Weaver" because I so love the image of Ma, the Great Mother, weaving the world into being.


When I look at the final piece I am reminded of the play between form and the formless.  I love the exquisite contrast between the black void and the abundance of arms emerging from that void.  If I am honest I have quite a preference for form.  I am in awe of this world, the trees, the acorns, the sky, the sun, the moon, the plants, the flowers . . . I could go on and on.  If everything in this world is the body of the goddess then, as Ed Sheeran puts it,

"I'm in love with the shape of you
We push and pull like a magnet do
Although my heart is falling too
I'm in love with your body."


A giant thank you to my husband George.  Without his love and support none of my crazy projects would be possible.

This piece is currently available for purchase at Nessypress.com/acorn-caps.

Sunday, June 9, 2019

Sweetgum Ball Sculpture Proposal


Last month I submitted a proposal to the town of Silverton to build a 10-foot diameter steel Sweetgum ball.  Although I did not get the commission, I thought I would post my sketches and the description from the proposal below.


"Silverton has a strong history of celebrating the health and vitality of the community’s tree canopy. Considering its history of urban forestry and its designation as a “Tree City,” I wanted to propose a sculpture that would remind viewers of that connection. I am therefore proposing to build a 10 ft. diameter Sweetgum ball that would be made of steel. The entire body of the piece would be made of sheet metal welded together. A supporting “soccer-ball” frame would be built to house each of the “arms.” The three-dimensional “arms” of the sculpture would be created using slats of sheet metal, similar to my other metal sculptures (see images here). Steel is a perfect material for this sculpture as it will turn brown as it rusts to mimic the brown color of a real Sweetgum ball."


"The Sweetgum tree (Liquidambar styraciflua) 'is one of the main valuable forest trees in the southeastern United States, and is a popular ornamental tree in temperate climates' (Wikipedia). Cincinnati is at the top of its native range and it is well-known by its star-shaped leaves and hard, spiky fruits. The seeds are eaten by finches, sparrows, doves, and wild turkeys. Small mammals such as chipmunks, red squirrels and gray squirrels also enjoy the fruits and seeds (ArborDay.org). Humans have also enjoyed sweetgums for centuries, chewing the sap as gum and also enjoying a wide variety of medicinal benefits. And although the Sweetgum balls can be a hazard when mowing the lawn or walking barefoot, the seedpod itself is quite stunning."


"Below is a rendering of how the Silverton Sweetgum ball would sit on location."


Yesterday a new friend told me that you either succeed or you learn.  It took me a minute to let that sink in, but once it did I loved the idea. A part of me was sad I didn't get the commission because I think the world would be a better place with a giant steel Sweetgum ball.  But I learned there is a joy and a power in having an idea and communicating that vision to the world.  And just working on this watercolor sketch made me weirdly happy.  I usually like to end with a quote, but there were too many good ones about this subject.  So I will leave you with three of my favorites:   


"Would you like me to give you a formula for success?
It's quite simple, really: Double your rate of failure.
You are thinking of failure as the enemy of success.
But it isn't at all.
You can be discouraged by failure or you can learn from it,
so go ahead and make mistakes.
Make all you can.
Because remember that's where you will find success."

-- Thomas J. Watson


"Success is not the key to happiness.
Happiness is the key to success.
If you love what you are doing,
you will be successful."


-- Albert Schweitzer


"Everything you want is on the other side of fear."

-- Jack Canfield

Tuesday, June 4, 2019

Abierta


Last month George and I drove to Santa Fe to pick up the fired sculpture I made last summer at Roxanne Swentzell's workshop.  The drive was 2 twelve hour days there and 2 twelve hour days back, but we got her home safe and sound.

Before we brought her home we took her out into the desert to photograph her in her natural setting.  She is not a light girl so George helped me move her all around, trying to capture the best light and angle.


The sculpture's name is "Abierta", which means "openness".  When I did the original blog post about making her, I wrote about how the hole has several meanings to me ranging from infertility to joy and abundance.  But when I sat down to write this post another interesting idea occurred to me.

Last week was a challenging week in a couple ways.  My Dad's house was hit by a tornado.  He was lucky he didn't lose his roof like most of his neighbors.  But he did lose his fence.  He had a wood fence that was completely flattened by the wind.  As we were picking up the pieces of the fence I saw his neighbor's fence two houses down was still standing.  But the fences were different in one important way.  My Dad's fence had no spaces between the vertical wood slats while his neighbor's fence had a space about the width of a slat between all the pieces.  The wind just sailed right through and his neighbor's fence was spared.


The other challenging thing that happened this week was that I had a fight with a person dear to me.  There was a stressful situation and I felt a couple of negative comments directed at me.  Afterwards I was sitting with the hurt of the words and had the thought, "Can I let these 'arrows' fly through me?'"  I had to ask myself if there was truth to the negative comments.  If there was truth to the comments then those arrows were going to hurt and I need to further examine my responsibility.  But if I honestly looked and there was no truth, then the wise thing would be to let the arrows fly right through.


As I thought about both my Dad's fence and my argument I realized that there is a great advantage to being open.  The more open I am, the less resistance I present.  The less of "me" (or my ego) there is, the more likely the wind won't knock me down, the arrows will fly right through, and maybe if I am lucky a little sunlight will come in.


Although the last paragraph was the prefect ending to the blog post I had to add an addendum.  I have been struggling this week with the question "Is it possible to be too open?"  I don't know the answer to that question, but I do know it is important to have boundaries.  "Fences" serve an important purpose.  They help keep the good things in and the bad things out.  Maybe the trick is to find just the right balance between strong boards and empty spaciousness.  I want to be spacious enough to feel the thrill of those strong winds but also to remain standing when the tornado blows through.  The truth is we will all get knocked down.  But every time we get knocked down we are reminded to find our inner spaciousness and our strength.  We are both the tornado and the calm.