Last year my nephew saw the cat embroidery I did for my mom and asked if I could do another. I told him I could but was confused because he doesn't have a cat and he said, "I don't want a cat...but can you do an ewok?" I told him I would think about it. And that is how I came to this fun project.
Not wanting to be too obscure, I chose the most famous ewok of all named Wicket. If you don't remember Wicket appeared in Return of the Jedi and helped the Rebel Alliance defeat the Galactic Empire during the Battle of Endor.
I finished the embroidery in January and had just given it to my nephew when I got the email about the upcoming "May the Fourth Be With You" art tribute show. Last year I did a linocut print of Max Rebo for the show and I knew I wasn't going to have time to pull together a print. But luckily my nephew gave me permission to put Wicket in the show (although he won't be for sale).
Below you can see the completed embroidery. I had so much fun going to the bead store and searching for the perfect stone for the top of his staff. And if you were wondering, yes, there is more ewok under that scarf!
I normally like to end with a quote but, seeing how Wicket spoke Ewokese, I will leave you with a short Ewok phrase and a Yoda quote..."Yub Nub!"
“Do. Or do not. There is no try.” – Yoda
If you are in Cincinnati "do or do not" come out to the show. The opening is May 4th at the Brew House from 5-11 pm. "May the Fourth Be With You!"
I am so excited to finally post my latest linocut print... "The Bundleflower." As you may know this has been a marathon print for me and I have been slowly blogging about the long process. My first post was about the bundleflower plant and carving and printing the first and second colors (cream and
burnt orange). The next post was about carving and printing the third color, red. And the third post was about carving the final plate. Below you can see each step of the four-color reduction process where the plate is carved away more and more with each color printed.
This video shows me inking the plate with the last color, dark brown.
And here is a video of me burnishing and pulling the final print.
I originally planned to print twelve 4-color prints. But after I printed the orange color I liked the plate so much I bought six more sheets of paper with the intent to just print the orange plate and keep it as a final record and print. However, after I printed the red color I couldn't help but be curious what it would look like on the orange and I ended up printing all the colors. This resulted in twelve 4-color prints and six 3-color prints (the six prints were missing the original cream color). I was thinking I might offer them as is (with a white background) or I might add a watercolor background to them. Here you can see the two options.
Below are a few detailed shots of the print (from a gazillion angles!).
I had the bright idea to bring half of the prints up to the porch to photograph them. But between the cats and the prints still being slightly damp it was a harrowing experience. Plus my light was fading and I really only got a few good shots in before it got too dark. I had to re-photograph the following day but it was fun to see them all together.
This print has truly been quite a long journey for me. At every step of the way there were so many directions I could have gone, but in the end I had to choose a single path and follow it. I fell in love with the plate after each carving and wanted to stop and not move on. It was hard for me to destroy the plate with each new color... but then I would fall in love all over again after the next carving. It made me see how easily I get attached to things and don't want them to change. But I quickly learned that change might very well bring something fabulous!
The final print is available now on my website NessyPress.com.
Before I end this post I wanted to especially thank my husband George. Without his love, support, food, and burnishing muscle this print would not have been possible. Also, a big "Thank You" to all my friends who lent a hand (Margot!) and an ear to me during this project. And finally if you have stuck with me this long through this post I would also like to thank you! I love my tribe!
Please help me spread the word by sharing this post and NessyPress.com with whoever you think might be interested. Thank you!
When I was little we used to play hide-and-go-seek in the backyard until it got too dark to see. We also used to play with our Star Wars figures around the big old maple tree... pushing them into the holes in the roots and pretending they lived there. As I sat down and looked at these photos I realized that arranging flowers in a bowl in my backyard is the adult equivalent of play for me. I could spend hours rearranging, photographing, and losing myself in this activity.
I also love working on the photos when I come back inside. I like to adjust the lighting levels so it is perfect and I also like to try cropping the photos in different ways. I also love to zoom into the image to see things I hadn't seen before. When I am finally finished playing with that I upload them to my blog. And then comes the harder part for me... the writing.
I almost always just sit back for a while and stare at the images. I try and see what they evoke in me and what lessons they have to tell me. Sometimes it is clear what the images have to say and sometimes I sit there going off on different tangents before I find my way.
The main thing that kept coming to me when I looked at these photos was a sense of pure brilliant joy. I don't think one can look at these images and not feel a little happier and energized. I love that they are unabashedly calling the world to look at them and to pause for a moment of pure delight and wonder.
So even if spring flowers aren't your favorite form of play, I would encourage you to find the thing that calls your heart...the thing where you lose all sense of time because you are enjoying yourself. Maybe it is reading, or building Lego fantasy realms, or ping pong or playing with your mini-poodle. Whatever it is...find it and let yourself play.
“We are never more fully alive, more completely ourselves, or more deeply engrossed in anything than when we are playing.”
This post was supposed to be the final post about the bundleflower...but I had no idea after I cleaned the red color from the last print that the plate would be so "pretty in pink". So again I had another long photo session to document the carving. (This is the third post in a series - here are Post 1 and Post 2.)
Below you can see what the plate looked like before and after carving for the final color. I
had to remove all the seeds so those sections would remain red and it
felt a bit like carving the seeds out of a pumpkin. In
the beginning it was hard for me to "destroy" the plate, but once I got going it
felt good to clear it away.
Here are a few photos of the plate mid-carving where you can still see lots of red.
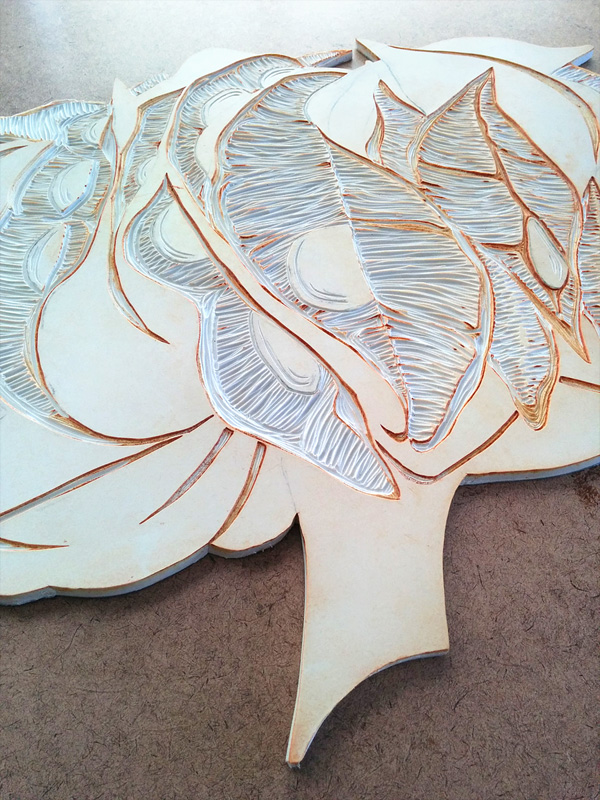
Once I cleaned up all the shavings and finished carving, the plate seemed so "clean" and I noticed how nice the colors of the pink and cream plate were against the brown fiberboard of my carving table.
As you may or may not know, when I take photos I am the opposite of a landscape photographer. One of my favorite things is getting up really close to my subjects because when you are that close you see things and learn things you never could have known were there. Its like getting close to a mystery and, perhaps if you are lucky, a few secrets will be whispered in your ear.
When I started photographing this plate I looked down and realized I had created a landscape... a vast panorama in which I intimately knew every pathway and gulley. And it made me wonder where it all came from and what else was inside of me waiting to be known?
(Maybe it is weird to quote myself, but this photo called for it.)
In some of the photos the plate looked bubblegum pink and the whole thing seemed so "girly" it made me laugh.
The photo below reminded me of a big, fat, pink fiddler crab with two eyes poking out at the top and pincers everywhere (or a character from a Miyazaki movie).
The video shows a short clip of me carving the plate. I am taking away the sections where I want the red color to remain.
I was going to post a video of me pulling the final color from this plate but I decided to save it for the last post. Instead I will leave you with this lovely quote:
“One of the strangest things is the act of creation.
You are faced with a blank slate—a page, a canvas, a block of stone or wood, a silent musical instrument.
You then look inside yourself. You pull and tug and squeeze and fish around for slippery raw shapeless things that swim like fish made of cloud vapor and fill you with living clamor. You latch onto something. And you bring it forth out of your head like Zeus giving birth to Athena.
And as it comes out, it takes shape and tangible form.
It drips on the canvas, and slides through your pen, it springs forth and resonates into the musical strings, and slips along the edge of the sculptor’s tool onto the surface of the wood or marble.
You have given it cohesion. You have brought forth something ordered and beautiful out of nothing.
You have glimpsed the divine.”
― Vera Nazarian, The Perpetual Calendar of Inspiration
The final print is now available on my website, NessyPress.com.
As I explained in my last post, this print was a "reduction" linocut. That means the plate is carved away a bit more with every color. In other words...the plate is slowly destroyed. Knowing that, I went a little crazy with the photography so bear with me on this post.
As you can see below, the third color was a brownish-red color. In the final print you will see that only the seeds will remain red so most of the red you see here will get covered by the final color.
Here is a video of me applying the red ink to the plate.
I took over a hundred photos of the plate at this stage and had a VERY hard time whittling it down to a reasonable number. I just loved the drama of all those curvy lines and the way the orange ink still lay in some of the grooves.
I also sprinkled in a few quotes to keep it interesting.
The video below shows me unsnapping my registration pins (they are called Ternes-Burton clips) and pulling the paper away from the plate to reveal the print.
The last photo is an upside-down shot of the prints drying. It seems they take longer and longer to dry with each color applied. The final print is available at NessyPress.com. Check out the final carving in my next blog post!