Showing posts sorted by relevance for query dutch. Sort by date Show all posts

Monday, December 6, 2021

Pennsylvania Dutch Hex Sign


“You’re constantly surrounded by signs, coincidences, and synchronicities ,
all aimed at propelling you in the direction of your destiny.”
– Denise Linn

INSPIRATION

In February 2021 a strange synchronicity occurred.  I received a package in the mail from my friend, Courtney, who I hadn't seen for a while (I hadn't seen any of my friends in a while at that point due to the pandemic.)  She sent me a booklet she saw at an antique store called Hexology: the History and The Meaning of the Hex Symbols by Jacob and Jane Zook.  She said she saw it and thought of me.  

I was delighted to have such a wonderful surprise arrive at my doorstep.  Courtney knows that I love folk design and this book was chock-full of really nice examples of Pennsylvania Dutch hex signs. Some view the hex signs as simply decorative while others believe the signs bring good luck, abundance, protection, or good weather for crops.  (For more hex sign meanings read here.)  Below are some examples from the book.
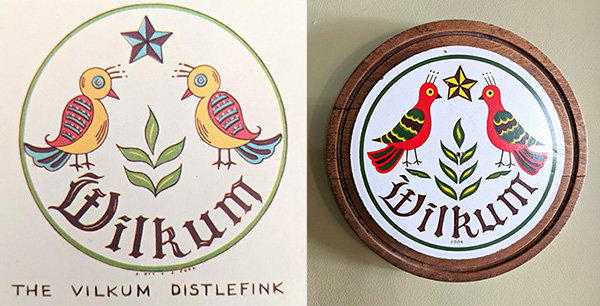
The amazing thing that happened when I turned to the back cover of the book was that I recognized the "Vilkum Distlefink".  A couple years ago I purchased the exact same sign at an antique show and glued it to a round piece of wood.  It now hangs in my entryway.  What are the chances that my friend would send me a book with the exact same sign?  Apparently the "distlefink" is a sign of good luck and happiness.  

DESIGN

I hadn't thought about the book my friend sent until this summer when, out of the blue, my Dad asked me to paint him a "barn emblem."   I had no idea where he got that idea, but I knew where to look for inspiration.  I poured through the book and internet and considered several different routes.  At first I thought he should have a Native American inspired design because of his heritage.  I sent him a few options.  Then he said he had looked at several Pennsylvania Dutch designs and his original idea had leaves going around the edges.  So I decided to try to marry the two inspirations (Native American and Pennsylvania Dutch) by incorporating a "sun" and "quilt" look.  Below you can see how I played around with the design in Illustrator until I honed it down to the final choice (starred in red).  


After the design was finalized, I printed it out to the size of the wood circle we bought which was thirty inches.  Below you can see my assistant checking it out.


PAINTING

Once I had the print out, I had to transfer it to the wood circle.  I bought a really nice, giant compass from Amazon.  I was really impressed with how heavy duty it was and it was very helpful in transferring the design.  I also used carbon paper to help me transfer the triangles.


I wasn't a hundred percent sure that using painter's tape would give me really clean lines.  I bought the green "frog tape" that is supposed to do just that, and it worked wonderfully.  I did paint a white layer first so that if it was going to bleed, it would bleed white onto the white background.  And then I did the color layer after the first white layer dried.  

I was especially impressed that I was also able to cut the tape and it still gave me clean lines! Below you can see I placed the green tape where I wanted my outer circle.  I then scribed a circle with the compass and used an X-acto blade to cut the tape.  It worked incredibly well!


This 60 second video shows the entire process from sketch to painted finish.  Turn your volume on! (Music by lesfm from Pixabay)


OHIO STAR

After I posted the photo below on Instagram, my friend Mark sent me a message asking if I knew the significance of the Ohio star.  I found out what I thought of as the blue "quilt" part of the design, is actually called an "Ohio Star."  This shape has a rich history in the quilting world and has been around since the early 1800's.  The "block" has been called by several names but earned the name "Ohio Star" in honor of the town of Oberlin, Ohio and Mary (quilter) and Lewis Leary, and John Brown's anti-slavery efforts.  (The full history can be found here and here.)   I had no idea when I chose that shape that it was an important historical symbol for Ohio!


SIGNING & COATING
I knew the sign was going to get a lot of sun hanging on the shed and that it should probably be protected from both the weather and the sun.  Before coating it, I signed the back of the hex sign with a red Sharpie pen.  I then sprayed it with exterior water-based Varathane.  I did a TON of research about this.  It came down to the Varathane spray or Minwax Polycrylic water-based polyurethane.  I learned it is important to use water-based polyurethan because oil-based poly will give white paint an orangish hue.  One could also use an epoxy coating, but I didn't look into that option too much because this seemed way easier.  I will report back in a year or so to see how this held up.  I think you are probably supposed to do this every year to provide UV and weather protection.
INSTALLATION

My original idea for hanging the hex sign was to simply put a wire across the back and hang it by a screw on the shed.  But my Dad was worried about the wind picking it up (he recently lived through a bad tornado).  I then came up with what I thought was a genius idea.  I thought we could use two French cleats facing parallel to each other to form a sleeve.  And then George had the even more genius idea to turn the two cleats vertical and put a stopper underneath so the sign would hit the stopper and be held in place by gravity and the cleats.  I bought the cleats and on Thanksgiving day we went out to install them and realized our beautiful plan was foiled by the uneven, wonky walls of the shed.  

In the end we went with the simpler method of attaching 3 stainless steel D-rings to the back. 


We then marked the placement of the D-rings on the paper template, drilled three holes in the shed, strung wire through the rings and pulled it through the three holes.  On the back side we just twisted the wires around each other to hold it tight. 


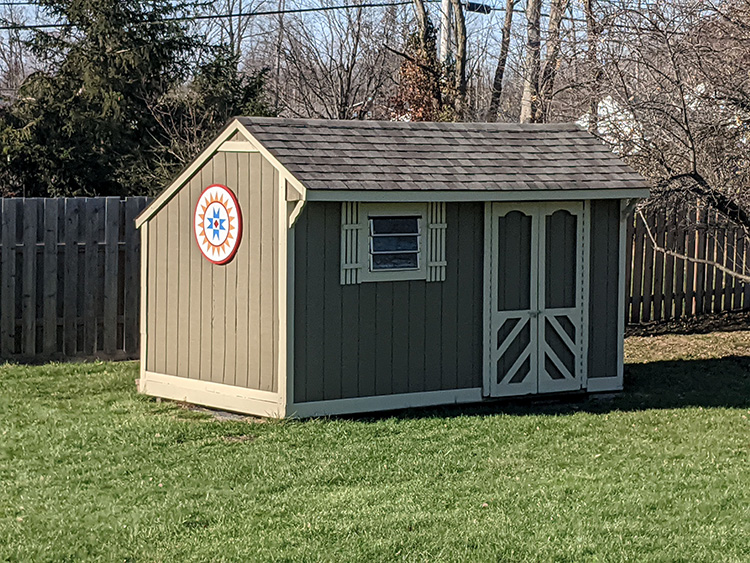
When my Dad first asked me to make him a "barn emblem" back in September, I didn't know that he was going to have knee replacement surgery at the end of October.  The timing of it worked out perfectly so that I worked on painting the sign when I went up to stay with him after his surgery.  After a difficult day or two, we got into a routine where I would help him come down his stairs and set him up in front of the TV.  We would then eat breakfast together.  Usually around the time the "Price is Right" came on, I would start working on taping and painting the sign.  As I was painting we would both be rooting for the contestants to spin a dollar on the big wheel or exclaiming when someone won a fancy car or vacation.  I loved spending this time with my Dad.  I like to think that love worked its way into the paint and rays of this Ohio star, and will shine brightly for many years to come. 


“We have calcium in our bones, iron in our veins, carbon in our souls, and nitrogen in our brains. Ninety-three percent stardust, with souls made of flames, we are all just stars that have people names.” — Nikita Gill



“What are we but shooting stars, hoping to shine long enough to make at least one soul believe in the magic.” — Sherry Namdeo


A big "THANK YOU" to my incredibly supportive husband George.  You make all my crazy projects possible and tolerate endless discussion about mundane details of French cleats, miniature, stainless steel screw eyes, and weight capacity of D-rings.  You are truly my partner in all projects and I love you.  

Sunday, December 22, 2024

Pennsylvania Dutch Carved Trivet: "Chasing Mink"

What does the artist do? He draws connections. He ties the invisible threads between things.
—Anselm Kiefer

INSPIRATION


It is fascinating to look back and see how events wildly separated in space and time all became connected by this piece of wood. What appeared to be disparate threads of inspiration came together to weave this trivet into being. Below is a list of those events.

The first event occurred in November of this year.  My friend Tiffany who lives in New Hampshire told me that something was killing their chickens.  So she and her husband Brian decided to put a camera into the coop to see what was going on.  One day she texted me the photo below.


She told me the remaining chickens seemed to be traumatized and would not go back into the coop.  Eventually they were down to one solo chicken and they had to re-home it on a farm so it could be with other chickens.  I noted the story and didn't think much more about it until a couple weeks later when Tiffany told me she put something in the mail for me.  She told me not to worry about getting them anything for Christmas...that is unless I was going to make something.

Tiffany and I share a love of making (IG: wunderkammerworkshop and curiousgood).  I would describe both of us as "makers" to our core.  We both like to dabble and play...she is brilliant and tends towards electronics, robots, glass, and machinery.  I tend toward printmaking, folk art, illustration and watercolor.  So when I thought about what to get Tiffany for Christmas I knew it had to be handmade...but what? My mind started working on it.  

The second event might better be described as a growing interest in wood carving. One of my artistic goals this past year was to try mediums different from printmaking.  This is partly due to the foxing fiasco that ruined many of my prints last year (bottom of this post) and a desire to make something more durable.  But also because carving is my favorite part of the printmaking process.  In addition, ever since I tried my hand at carving my neighbor's chair that needed restoration, I have been wanting to attempt it again...just carving...no printing.

1. My bird chair carving  2. My friend John's chip carving  3. My favorite trivet

And, by chance, just last week I came across two wood carvings that deeply inspired me.   My friend John posted a photo on Facebook of his chip carving.  John and I grew up on the same street and went to exactly all the same schools from nursery to grad school.  And weirdly we have shared similar creative interests over the years, including chip carving. 

Also, the same week, I had been clearing space for Christmas decorations and had moved three wooden trivets I love that I always have on display.  As I moved them, a flower in the middle of one of them caught my eye and I stopped to really admire the rustic beauty of the carving.  I imagined some person in India carving this many years ago and how this wooden circle travelled quite a distance to come into the hands of a girl living in Ohio who would love the designs and be inspired to make something similar. 

The third factor that contributed inspiration is my obsession with folk designs.  When I started going to antique shows, one of the first items I began collecting were textiles (red, yellow, pillow) and signs with Pennsylvania Dutch  designs.  My friend Courtney even sent me a book she found with incredible photos of these motifs.  You can see the book and the hex sign I painted for my Dad's shed in this post.
You might wonder what brought all these pieces together and the answer is, "meditation".  One day I was sitting in my daily class at the Mystery School letting my thoughts slowly drift to the bottom of the ocean, when something arose from the depths.  Sometimes when this happens I let the thought arise and sink back down.  But I couldn't ignore this one...it just kept bobbing up. The thought was "I should carve Tiffany a trivet in the Pennsylvania Dutch style with a man and a woman chasing a mink chasing a chicken!" I would make what is possibly the world's first hand-carved Pennsylvania Dutch "Chasing Mink" trivet!

SKETCHES

Even for me this was an ambitious idea.  I wasn't sure I could draw this, let alone carve it.  But right after meditation I did a few rough sketches seen below.

DESIGN

Originally I thought I would alternate the position of the running mink from stretched-out to contracted.  The beauty of designing it in Illustrator is that I tried out all sorts of variations.  In the end I chose to keep the same mink and just alternate the man and woman so that it would have a consistent feel in each quadrant.  It felt too asymmetrical alternating the mink position.  Below you can see how I started with my rough sketches and then traced them in Illustrator and refined the design.  I am always surprised at how my wonky sketches end up working out somehow.
After finalizing the design I printed it on regular paper.  I bought the wood circle at JoAnn Fabrics and planned the design to fit perfectly to that size.
TRANSFER

I used carbon paper to transfer the design from my printout to the wood.
CARVING

I was nervous to start the carving.  When I looked at the design I felt it was a formidable challenge.  I wasn't sure if the people were too small and if I was going to be able to even carve something so detailed. 
But after the the first chicken and mink I felt relieved that it was probably possible.  Below is a photo after my first day carving.  I have no idea how long this took me...most likely somewhere between two and four hours.

Below is a photo at the end of day 3.
I was getting excited at this point and knew it would go much easier once everything was "outlined."
I saved the scalloped edge for last.  I wasn't sure how the scallops were going to interact with the bevel exactly, but I figured I would wing it as I carved.
Whenever I see the photo below I think of golden Oreo cookies.  As you can see, I ended up keeping the scallops flat and adding simple line details coming out of each scallop.  I also spent days deepening the flat surfaces.
Below you can see detail shots of the different quadrants.
In this photo you can see the cross grain cuts of the scallop lines started to get pretty chewed up.  Cutting across the grain in pine felt like pushing a bulldozer through dried mud.  It just crumbled away.  Luckily, the piece was meant to have a rough feel so I didn't sweat it too much.
I also tried to add subtle shaping to each figure.  You can see this in the woman's skirts and I added even more shaping to the rooster's arm feathers after this photo was taken.
I did accidentally cut off one of the mink's tails and perhaps a foot or two.  But I just carefully saved the pieces and glued them back on.
ADDING THE FEET

I wanted to add feet to the trivet so George helped me cut three small pieces with our Japanese hand saw. 


We sanded the edges of the feet to soften their look and feel.
Before gluing the feet on I scored the surface.  George also pre-drilled the nail hole.  He then poked the nail through and made a divet in the trivet exactly with the foot in our chosen position.  Then once I put the glue on he could find the spot again easily.
In addition to hammering the brad, he also used a countersink to make sure the nail was deeply embedded.


Below you can see the placement of the feet.  I also carved my initials and the date at the bottom.
STAINING

My friend Mark helped me research various options for staining.  Apparently some polyurethanes are not suitable for heat.  He loaned me both Tung and Danish oil and I chose Tung, mainly because it had a matte finish and could take heat well.

After staining with one coat I realized I wanted it to be darker.  I liked the light look but thought a stain might delineate the carving lines.
I read online that you can add oil-based stain into Tung oil.  So I mixed in  a little bit of Early American Minwax stain.  Again, I applied it and let it sit five minutes or so...and then rubbed it off.  I probably stained it five times to get it to the darkness shown below (I started to lose track after a while.)
Below is a photo of the finished carving and some detail shots.  
My favorite part was the center flower and leaves.
When I showed my Mystery School friend this photo, she exclaimed, "It's a trauma trivet!"  It's definitely the world's first "Chasing Mink" trauma trivet.
FINAL PHOTOS

I might have continued staining until the cows came home but I wanted to mail it in time for Christmas.  It was time to take some final photos and wrap it up!
I took a couple photos to show the feet. You can see how they were fairly low but add a nice bit of elevation to the piece.

I also had fun photographing it with my Christmas decorations.
I think these Christmas trees were jealous of the carving.  Either that or they were quaking in their boots that I would take a knife to them!
We don't accomplish anything in this world alone... and whatever happens is the result of the whole tapestry of one's life and all the weavings of individual threads form one to another that creates something.
—Sandra Day O'Connor
VIDEO

I normally make all my videos 60 seconds or less and I thought about breaking this video into carving and staining sections.  But the photos and video went so well with the music I kept it as one complete story.  Turn your volume on!  (Music by Aleksey Chistilin from Pixabay)
 

CONCLUSION


In the end I was very happy with the whole experience.  It always feels good to attempt something a little past my abilities and see it turn out.  I definitely would do a few things differently next time, but overall this exceeded my expectations.  I like that you can buy a simple circle of pine wood from a craft store and make something amazing from it. 

I also like to look back and see how following threads of joy inspired the whole project. How a simple comment from my friend Tiffany nudged me to "make" something.  How my chip-carving friend's post caught my eye.  How cleaning and handling my favorite trivets, my love of Pennsylvania Dutch textiles and designs, a meditation, and the photo of a mink with a full tummy, all provided influence.  These events entered this awareness and exited these hands in the form of a carved piece of wood.  How amazing is that?  How we influence each other and how interconnected we all are!  I like to think that we are capable of spreading joy like wildfire.  By chasing our joy like a farmer chases mink we can create something the world has never seen before!  This world is pure magic.

"This joy thing is a really big deal. First to recognize its power, second to feel its authenticity, and finally to follow it's vibration. The frequency of joy (holding the vibration of joy for minutes or longer) is what grows your wealth, loving relationships, magnificent work in the world that is beyond fulfilling, and incredible health. It is your north star, your yellow brick road. It is everything."
—Marie Manuchehri

Wishing you and yours much joy in the coming year!        
 A big thank you to George for always helping me with my crazy projects.  Your support and food keep me alive.

Also, a big thank you to my neighbor Mark for tolerating my constant wood projects that need advice and help.  I am rich in oil and friendship.