Friday, September 27, 2013

Children's Book Illustration Art Show - Sharonville Fine Arts Center


Next month I (along with the above talented artists) am participating in a Children's Book Illustration Art Show at the Sharonville Fine Arts Center. Next Friday, Oct. 4 from 6-8 pm is the Opening Reception so if you are in the area you should stop by for a gander and some refreshments. The show is up from Oct. 4th to the 27th and each weekend during the show there will be special events with the illustrators as follows:

October 5th, 11 am: Tammie Lyon and Jeffrey Ebbeler will do a Live Drawing and Painting event, plus Story-time!

October 12th, 11 am: Christina Wald will do a Live Drawing and Story-time event!

October 19th, 11 am: Viki Woodworth and Vanessa Sorensen will do a Jokes, Mazes and Story-time event!


Hope to see you there!

Monday, September 23, 2013

Cincinnati & Suburban Bell Telephone Building in Westwood - Sketch


I've been getting behind on posting my sketching with Christina.  We sketched the old Westwood Library Annex almost a month ago now.  It is a very interesting building covered in cherubs and other odd figures that made sense after we discovered it was the old Cincinnati Bell Telephone Building.  You can see Christina sketched some more of the details here.  Apparently the building is considered an "architectural gem in the Italian Romanesque revival style" and is hopefully going to be renovated by a local puppet group (full story here).


Thursday, September 19, 2013

Walnut Emboss


This was my second emboss project for printmaking class at Xavier.  I wanted to do something that had texture and that would recede and protrude.  So I decided to do two walnut halves.  As I was cutting the walnut texture out of cardboard I happened to lean it against my sewing machine and it made the coolest shadow.  I almost wanted to keep it just like that but I had to glue it down to make more layers for the emboss.  Part of the assignment was to make a colored version and I am not quite done with that but will post when I finish.  I ♥ embossing!


Thursday, September 12, 2013

Metal Tile Roof with Solar Panels

After

Before
We recently added a metal tile roof and solar panels to our house.  Our roof was about 25 years old and we had a small leak above the front porch so we knew it was finally time.  I have always loved the tile roofed-houses in our neighborhood so when we investigated our options I was so excited to find Cornett Roofing's metal tile roof.

I am not usually a fan of products that try to appear to be something they are not (i.e. laminate floors that look like wood), but I was very impressed by the look of this roof.  We drove to Indianapolis to make sure we really liked how it looked and when we pulled up in a couple of the driveways I thought we had the wrong address because it looked like real tile.  You can tell that it isn't real tile once you look closely, but from the street it looks like clay tile.

We had a hard time choosing the color.  The tiles come in many different colors (and 2 finishes) and we narrowed it down to brown or red powder coated.  If we had chosen brown we could have left the dormers red, but I think we will end up painting them soon.  Overall I am very pleased with the roof and I think it upped our curb appeal by 110%. 


In addition to metal roofs, Cornett also installs solar panels.  George was super excited about this option. He has always wanted solar and it is a great time right now to install solar because of the government rebate.  It is a cool system because you can monitor real time how much energy you are making on your computer.  George has been obsessively checking it throughout the day and was excited because yesterday we made 17.5 kilowatts! When the Duke energy guy came to install our new meter it was set to zero and we were actually going negative until we turned the air conditioning on.  George thinks we can get back to zero this fall when we have no air on and lots of sun.  I told him I don't know if zero is a realistic goal, but as Les Brown said, "Shoot for the moon. Even if you miss, you'll land among the stars."  (Hopefully a bright star with lots of light to make solar energy!)

Sunday, September 8, 2013

Bird Flower Emboss - Printmaking


I am so excited to be taking printmaking this semester at Xavier.  This was our first test run project for embossing.  We had to come up with a 4''x4'' design to run through the press just to see how it works.  First we drew the design, then traced it onto cardboard.  Then you had to either carve the design out of cardboard or cut out layers of cardboard and stack them to create the emboss. 

I was beyond excited when I pulled this out of the press for the first time.  I never knew it but I looooooooooove embossing!  I love the subtle white on white with the design only created by shadow.  I could just do this the rest of the semester and I would be happy.

Tuesday, September 3, 2013

Balloon Plant Flower Arrangement


Last weekend we went to pick up our CSA vegetables at the Hyde Park Farmer's Market when I spied these incredible pale green orbs in the flower stand attached to our CSA.  I asked Sayward, the owner what they were and she told me they were a kind of milkweed.  (I looked them up and they are called Balloon Plant or Swan Plant (Asclepias physocarpa or Gomphocarpus physocarpus) and they are native to southeast Africa.)  I was so taken by the orbs I asked if I could have a  bouquet of just orange flowers and green orbs.  Sayward is totally amazing in that she can put together an amazing bouquet in about two minutes while you wait.  And this is what she made me!  I do believe this might be my favorite flower arrangement of all time.  Every time I walk down the stairs this bubbly green arrangement fills me with joy.  Thank you so much to Sayward and Hazelfield Farms Flowers!  You brightened my whole week.

And btw if you ever need flowers for an event they provide beautiful chemical and pesticide free flower arrangements for weddings and parties.  You can check them out here and here.


Tuesday, August 27, 2013

St. Mary's Basilica, Covington, KY - Sketchbook


A couple weeks ago Christina and I went to Kentucky to sketch the St. Mary's Basilica in Covington. From the outside it is totally amazing, but then you go inside and you can't even believe your eyes!  The amount of stained glass is mind boggling and it is crazy-beautiful.  Not to mention the intricate wood carving and the Duveneck murals.  If you are ever in Covington it is well worth it to visit.

I have really enjoyed these sketching outings with Christina.  She is so talented and I learn so much from her every time we sketch.  I love to watch how she begins a drawing and it has been really helpful to see how she depicts texture and shadow.  Not to mention I love how she paints her skies.  You can see her sketch of this same building here.  Thanks so much Christina for getting me out there - you're work inspires me to keep at it!


Thursday, August 22, 2013

Shitake Log


My friend Margot gave us a shitake log a few months ago.  We left it outside and nothing much happened with it.  But a couple weeks ago we went to her house and saw that she had a crazy motherload of shitakes.  It turns out you have to soak the log for 24 hours for it to develop.  We soaked the log last week and now we are in business!  The first night George cooked them in butter and I do believe they were the tastiest mushrooms I've ever had.  I don't know if it was the butter or the mushrooms, but I am loving the log!  Thank you Margot!

Tuesday, August 20, 2013

Screen Porch/Pergola Addition


I've been excited to post this project for a while now.  I helped my dad design and plan a screen porch addition, outside patio, pergola, and fireplace.  It all started with what my dad likes to refer to as "varmints."  His old wood deck had "varmints" living under it and he wanted to get rid of them.  The deck was pretty old so I suggested he add a screen porch like I did.  I did a mock-up in Photoshop (below) of what I thought it should look like last spring.  He showed it to his talented contractor, Jeff Boos.  And last fall Jeff built it in about 2 weeks!  I can't recommend him enough.  Not only was he on budget and on schedule, but he does beautiful work and has a great sense of design.


I have been waiting to write this post because my dad had the landscaping done this summer and I wanted the grass to grow in.  And this past Sunday the final touch was installed... the pagoda.  We had been looking for a while for a pagoda and we found the perfect one at Aquatic and Garden Decor in West Chester.  It felt really good to put it in place and call the job done!


Tuesday, August 13, 2013

Trumpet Vine


I know it's August when the corners of the driveway start to disappear in trumpet vines.  Last week I decided it was time to take the driveway back and when I got out there I couldn't bear to throw the flowers away.  I wasn't sure how trumpet vines would do in a flower arrangement but I was pleasantly surprised.  Their saggy heads looked beautiful all together and they lasted about three days before dropping to the floor. 

At times I think the vines in my back yard will be the end of me and when I read this quote by Abraham Lincoln I thought it was appropriate, "Do I not destroy my enemies when I make them my friends?"  Even though I was literally trying to destroy them, I do feel a bit friendlier towards them now.  I think we may even have a peace treaty - I give them the driveway for a month and then I cut their heads off for a nice flower arrangement...and everyone is happy.

Monday, August 5, 2013

Elm St., Cincinnati, OH - Sketch


Christina and I went to Washington Park to sketch a couple weeks ago.  If you don't live in Cincinnati and you ever come to visit you should definitely go downtown.  The architecture is really beautiful and many of the old buildings are now being renovated.  The buildings in my sketch are on Elm St. just next to the park.  Christina sketched in one direction (you can see her sketch here) and I sketched in the other. It's always interesting to sketch outside in a public place.  There were not only colorful buildings, but a few colorful personalities, as well as a biting fly that tortured us.  But in the end it was great fun and hopefully we will go again this week!

Friday, August 2, 2013

Bitter Melon


Last week George and my neighbor John took a trip up to Jungle Jim's with the express purpose to go and buy weird food.  "And did they succeed?" you ask?  I'll let you be the judge. 

They came home with 5 kinds of extremely bitter beer, burro bananas, stinky blue cheese and the bitter melon you see above.  When I saw the melon I was intrigued by its green, knobby body and when George cut it open I loved the pattern created by the seeds inside.  But I let its beauty fool me into tasting it and I can only describe it as incredibly hideous.  This melon activated every bitter taste bud on my tongue and I immediately had to drink some water to rid my mouth of the overwhelming bitterness.  Of course, George happily ate his and stir fried it for dinner.  I will never understand his affinity for the bitter.  As they say, "De gustibus non est disputandum!" - "There's no accounting for taste!"

Tuesday, July 30, 2013

Wabi Sabi Desert Plants


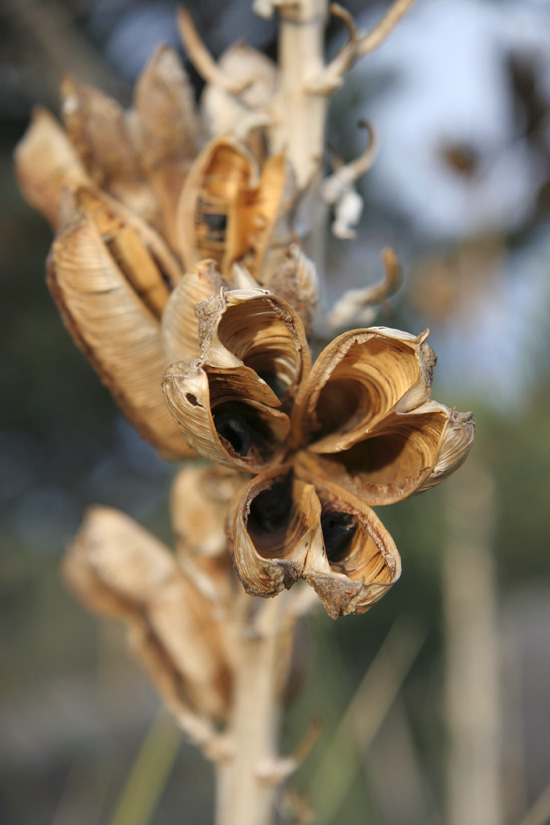
One morning when we were in Santa Fe we woke up early and went for a walk.  George's goal was to look for birds and mine was to photograph anything that caught my eye.  It is amazing what you can see if you walk slowly and really take time in the desert.  At first it might appear like endless junipers and dry arroyos, but if you stop and really get up close there are incredible things to see everywhere.

When I got home and looked at my photos I realized the majority of them were of dried out seed pods.  This always make me think of my favorite wabi-sabi books so I pulled them out and found this nice quote to end with from "Wabi-Sabi for Artists, Designers, Poets, & Philosophers" by Leonard Koren:

"Though things wabi-sabi may be on the point of dematerialization (or materialization) - extremely faint, fragile, or desiccated - they still possess an undiminished poise and strength of character."


Thursday, July 25, 2013

Museum of Contemporary Native Arts - Sketch


When we were in Santa Fe I went into town one morning with the intention to sketch the cathedral.  When I got there the sun was coming up behind the cathedral and the front was in shadow.  When I turned around to see what the sun was shining on I was greeted with this view of the Museum of Contemporary Native Arts.  Seeing how I am absolutely mad about adobe architecture, I think it was a stroke of great luck that the sun made me turn around that day.  This building is absolutely gorgeous!  I love the portal, the vigas, the curved walls, the balcony and towers, and the enclosed patio gardens.  And this is just one example of the amazing architecture downtown.  Santa Fe truly is one of my favorite places to visit and I already can't wait to go back.

(click image to enlarge)

Tuesday, July 23, 2013

Bird Scissors


When I saw the booth of Sayfullo Ikromov and Salimjon Ikramov at the International Folk Art Market I stopped dead in my tracks. I couldn't believe what I saw...could it be hand-crafted bird scissors?  How awesome is that?  As you know I like to collect bird-related everything and I had never seen this before!  I stood at this booth a crazy long time just examining all the birds.  There were flying birds, perched birds, male and female birds, and what appeared to be woodpeckers and herons.  Not only were they beautifully crafted but they also cut really well.  And in addition they would write any name on the scissors that you wanted (George's name is on the pair above).  It is so much fun to shop at a folk market like this and find something truly unique and beautiful that really speaks to you.  Thank you to the Ikromov's for bringing such wonderful objects into being. If you would like to contact the Ikromov's you can email them at raisa@salomtravel.com.

Monday, July 22, 2013

International Folk Art Market - Santa Fe


Last week George and I went to the International Folk Art Market in Santa Fe, New Mexico.  We had never been to the market before and this year we planned our trip around it.  It is the largest Internation Folk Market in the world and it did not disappoint!  It was truly a feast for the eyes (and ears, stomach, fingers and nose!)  I loved seeing the incredible work from people around the world.  The craftsmanship was amazing and it was truly a delight to meet the artists.  I also loved the variety...figurines woven from horsehair, the most-incredibly intricate gourd carvings, beautifully crafted jewelry, finely woven textiles, crazy musical instruments, scary masks, huge brightly-colored paper flowers, baskets woven from pine needles with amazing designs, Scandinavian wood carvings with lovely folk designs...I could go on and on!  Needless to say I had a wonderful day and will post soon about the artist whose table I couldn't leave.  (A big thanks to G for having lots of patience with me while I oohed and ahhed and fretted over what to buy!)


Friday, July 19, 2013

Peach Haiku


When I was looking in my folder of free Dover clipart for this post I came across the following a haiku I liked by James Kirkup:

Haiku should be just
small stones dropping down a well
with a small splash

I loved this haiku but I found it strange because it was given as an example of the 5-7-5 syllable rule for haiku.  But after I read it and counted the syllables it appeared to me the last line is only 4 syllables.  George thought maybe you could make it work by pronouncing splash as two syllables.  Anyway, it reminded me that you needn't always follow the rules.  I struggle with this concept because I am a rule follower.  And I really struggled with it when writing the poems for Zen Kitty and Zen Birds.  In the end I decided to write "haiku-like" poems (meaning I used however many syllables I wanted) for both those books.  I made this decision after reading a great book one day in the bookstore.  (I wish I knew the name of the book but it was just something I randomly picked up one day.)  The book stated that many of the haiku written by famous Japanese poets did not follow this pattern and most definitely don't follow the pattern when translated.  It went on to encourage the haiku poet to just use as few words as possible to get the idea across and to not obsess about the number of syllables. That was all this rule follower needed to let go.  And even though the above haiku does follow the "rules", I now feel completely happy to walk on the wild side when writing haiku.  If that means I am now a rogue bad-ass haiku writer (or just a bad haiku writer) then so be it. 

Wednesday, July 17, 2013

Pretty Peachy


Last week the peach tree in my Dad's back yard was chock full of beautiful peaches.  Everything about them has the essence of softness...from their fuzzy coat to the way the color gently fades from yellow to orange to pinky-red.  And the shape is so crazy adorable!  I love the way the two cheeks are separated by a valley on one side that ends in a miniature peak.  There couldn't be a much more pleasing object to hold in your hand.

When I went out to pick them with my Dad I had to run back to the house to get the camera because the light was perfect and they were practically glowing!  He just called me last night and told me he picked 60 more peaches and was asking what to do with them.  I told him he should make jam and found this great website about how to do it.  Hopefully next time I see him he will have some pretty peachy jam for me to sample... I will let you know how it turns out. 

Tuesday, July 9, 2013

Bee-utiful Purple Coneflowers


I was excited to zoom into this photo and find such a nice focused honey bee.  I always try and photograph them but they move on me. Lucky for me this one took a half second rest from his busy-bee purple-coneflower-checking schedule. 


I took this photo at my friends' house in Yellow Springs last week. They have a beautiful yard with a large section set aside for native wildflowers and the bees (and I) love it. Their house is close to John Bryan State Park and it is always such a treat to sit on their back porch and listen to the birds and have dinner with them.  Thanks Jyoti, David and family for such a lovely evening!

Thursday, July 4, 2013

Round Folk Tablecloth


This tablecloth was another great find at the Springfield Antique Extravaganza this past May.  As you know I collect vintage folk tablecloths and I couldn't believe my luck when I came across this one... I have never seen a round tablecloth in this style!  When I got home and tried it out on my entry table I was also happily surprised that it fit my entry table perfectly.  It did however have the same problem as the round tablecloth that I designed for Valentinte's day - it shrank more in one direction so it was no longer a circle but an oval.  I tried to ignore it but every day when I came down the stairs my eye went right to that uneven hem.  So I finally broke down and hemmed it  (again, breaking my rule of not buying things that need fixing).  But I love these adorable yellow characters and the charming Pennsylvania Dutch design makes me happy every time I see it.  So in the end it was worth it breaking the rules. 

Happy Fourth of July everyone!


Thursday, June 27, 2013

Fava Bean Salmon Pasta Salad with Carrot-top Pesto Tapenade


Last week we weren't sure what we were going to have for dinner.  George said he would make the fava beans we got from Hazelfield Farms and he would scrape something together from the leftover salmon we had from the night before.  In my head I thought, "Oh great, leftovers."  But when I saw what he came up with I felt like we were eating at a five-star restaurant! 

Not only did he find half a portabello mushroom in the fridge, but he decided to make use of the carrot tops and garlic scapes from our CSA to make pesto.  I have to give full credit to my friend Jennifer who gave us the idea for carrot-top pesto, and Julie for garlic-scape pesto.  We weren't so sure about using carrot-tops to make pesto but they work great all by themselves (or you could mix basil in if you wanted).  After trying this recipe you will no longer be able to throw those carrot tops into the compost pile!

CARROT-TOP GARLIC SCAPE PESTO TAPENADE

Carrot-tops from about 10-15 carrots
5-10 garlic scapes (you can use 1 or 2 cloves of regular garlic if you don't have scapes)
1/2 cup almonds (or pine nuts)
1/4 to 1/2 cup olive oil
olives or capers (if you have them)
dash of salt

Cut carrot-tops off of carrots and wash.  Wash and chop garlic scapes (you can use the entire thing, it is just easier to chop it into smaller pieces to fit in the food processor). Combine all ingredients in a food processor and mix until well blended.  Add olive oil until all ingredients are moist.

FAVA BEAN SALMON PASTA SALAD WITH PESTO

1 salmon fillet
pasta (we usually make 1/2 -2/3 box)
fava beans
mushrooms (pick you favorite kind - we used portabello)
green olives
chick peas
pesto
olive oil

Prepare salmon according to directions (we have been using frozen fillets and baking them in the oven at 325 for 30 minutes).  Cook pasta timed to finish when salmon is done.  The fava beans require a bit of prep which can be done earlier if desired. Pre-heat skillet with olive oil.  Add mushrooms and cook until they release water (maybe 4-5 minutes).  Then add all other ingredients to skillet if you want to serve warm.  If you want to serve cold, mix all ingredients in bowl and refrigerate.

Tuesday, June 25, 2013

Fava Beans - How to Prepare


I thought this post was just going to be about how to prepare fava beans but when I went to decide on the images for the post I couldn't decide between the above and below photos.  So let me know via comment on the blog, facebook, or email which is your fava-rite (pun courtesy of hubby George) and I will post the results in the comments next week.


Now to get down to business. We have been getting Fava beans from Hazelfield Farms at the Hyde Park Farmer's Market and I just can't get enough of them. They are super delicious and in my opinion one of the most beautiful beans around.  The pod itself is large and beefy and the color of the bean is a soft, dreamy green.  They do require a little preparation but it is well worth the effort.  Here is how George prepared ours:


  1. Open outer pod and take out beans. (It helps to have a knife because the pod can be strong).  Admire their beautiful soft green bodies.
  2. Boil the beans for 2-3 minutes.  This helps soften the coat.
  3. Put beans in an ice bath.  (Probably not totally necessary, but it helps to cool them off).
  4. Peel the outer coat off beans.
  5. Eat raw or saute with olive oil or butter or add to a salad.

Check back soon because I am going to post a fava bean recipe that George came up with that blew me away!